1. 环境说明
- 操作系统:macOS 11.7
- Python:3.10.6
2. 安装
2.1. 创建测试环境
mkdir playwright-demo
cd playwright-demo/
python3 -m venv venv
# 安装 Pytest 插件
venv/bin/pip3 install pytest-playwright
# 安装需要的浏览器
venv/bin/playwright install
2.2. 添加样例测试
在当前工作目录或子目录内部,创建test_my_application.py文件,其内容如下:
import re
from playwright.sync_api import Page, expect
def test_homepage_has_Playwright_in_title_and_get_started_link_linking_to_the_intro_page(page: Page):
page.goto(“Fast and reliable end-to-end testing for modern web apps | Playwright”)
# Expect a title “to contain” a substring.
expect(page).to_have_title(re.compile(“Playwright”))
# create a locator
get_started = page.locator(“text=Get started”)
# Expect an attribute “to be strictly equal” to the value.
expect(get_started).to_have_attribute(“href”, “/docs/intro”)
# Click the get started link.
get_started.click()
# Expects the URL to contain intro.
expect(page).to_have_url(re.compile(“.*intro”))
2.3. 运行样例测试
默认情况下,测试运行在 chromium 上,可通过 CLI 选项进行配置,测试以 Headless 模式运行。测试结果和测试日志被展示在终端中。
3. 编写测试
Playwright 断言(assertion)是专门为动态网页创建的。检查会自动重试,直到满足必要的条件。Playwright 自带 auto-wait,这意味着它在执行操作之前等待元素变为可操作的(actionable)。Playwright 提供 expect 函数来写断言。
下面的样例测试展示了如何写使用断言、定位器(locator)和选择器(selector)的测试。
import re
from playwright.sync_api import Page, expect
def test_homepage_has_Playwright_in_title_and_get_started_link_linking_to_the_intro_page(page: Page):
page.goto(“Fast and reliable end-to-end testing for modern web apps | Playwright”)
# Expect a title “to contain” a substring.
expect(page).to_have_title(re.compile(“Playwright”))
# create a locator
get_started = page.locator(“text=Get started”)
# Expect an attribute “to be strictly equal” to the value.
expect(get_started).to_have_attribute(“href”, “/docs/intro”)
# Click the get started link.
get_started.click()
# Expects the URL to contain intro.
expect(page).to_have_url(re.compile(“.*intro”))
3.1. 断言
Playwright 提供 expect 函数,它会一直等待,直到满足预期条件。
import re
from playwright.sync_api import expect
expect(page).to_have_title(re.compile(“Playwright”))
3.2. 定位器
定位器(Locators)是 Playwright 的自动等待和重试能力的核心部分。定位器表示一种随时在网页上查找元素的方法,用于在元素上执行诸如 .click、.fill 之类的操作。可以使用 page.locator(selector, **kwargs) 方法创建自定义的定位器。
from playwright.sync_api import expect
get_started = page.locator(“text=Get started”)
expect(get_started).to_have_attribute(“href”, “/docs/installation”)
get_started.click()
选择器(Selectors)是用于创建定位器的字符串。Playwright 支持许多不同的选择器,比如 Text、CSS、XPath 等。通过 in-depth guide 文档,了解更多关于可用的选择器以及如何进行选择的信息。
from playwright.sync_api import expect
expect(page.locator(“text=Installation”)).to_be_visible()
3.3. 测试隔离
Playwright Pytest 插件基于 test fixture(比如 built in page fixture)的概念,它会被传给你的测试。由于浏览器上下文,在测试之间,页面(page)彼此隔离,这相当于开启新的浏览器行为,每个测试获得新环境,即使在一个浏览器中运行多个测试时,也是如此。
from playwright.sync_api import Page
def test_basic_test(page: Page):
# …
3.4. 使用测试钩子
你可以使用各种各样的 fixtures 来在你的测试之前或之后执行代码,以及在它们之间共享对象。函数(function)作用域的 fixture 具有 beforeEach/afterEach 一样的自动使用行为。模块(module)作用域的 fixture 具有 beforeAll/afterAll 一样的自动使用行为,它会在所有测试之前和所有测试之后运行。
import pytest
from playwright.sync_api import Page, expect
@pytest.fixture(scope=”function”, autouse=True)
def before_each_after_each(page: Page):
print(“beforeEach”)
# Go to the starting url before each test.
page.goto(“Fast and reliable end-to-end testing for modern web apps | Playwright”)
yield
print(“afterEach”)
def test_main_navigation(page: Page):
# Assertions use the expect API.
expect(page).to_have_url(“Fast and reliable end-to-end testing for modern web apps | Playwright”)
4. 运行测试
你可以运行单个测试、一组测试或全部测试。测试可以运行在一种或多种浏览器上。默认情况下,测试以 headless 方式运行,这意味着在运行测试时,不会打开浏览器窗口,可以在终端中看到结果。通过使用 –headed 标记,可以以 headed 模式运行测试。
– 在 Chromium 上运行测试
– 运行单个测试文件
– 运行一组测试文件
pytest tests/todo-page/ tests/landing-page/
– 使用函数名运行测试
pytest -k “test_add_a_todo_item”
– 以有头(headed)模式运行测试
pytest –headed test_login.py
– 在指定的浏览器上运行测试
pytest test_login.py –browser webkit
– 在多种浏览器上运行测试
pytest test_login.py –browser webkit –browser firefox
– 并行运行测试
pytest –numprocesses auto
(假定已安装 pytest-xdist,查看 here 获取更多信息。)
4.1. 运行测试
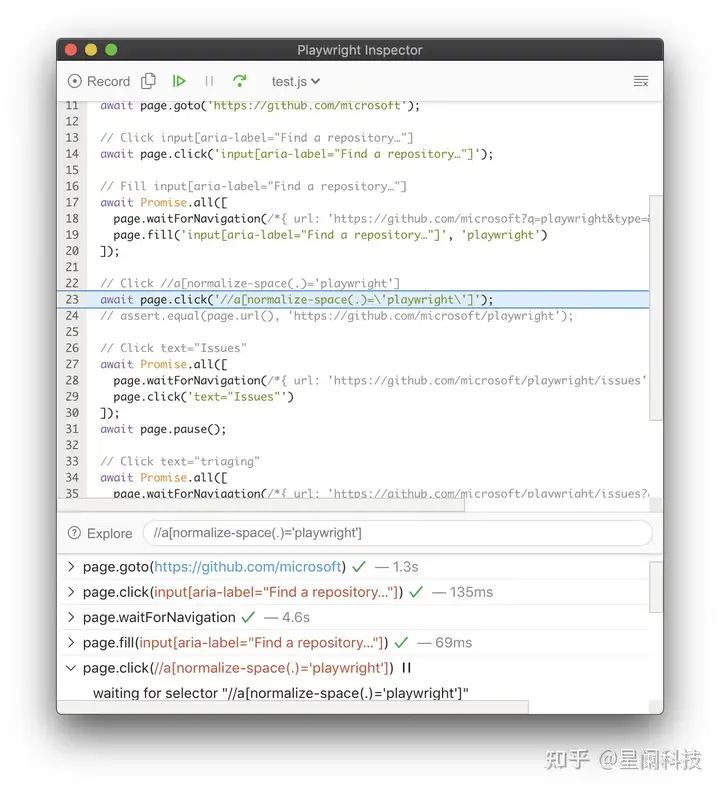
因为 Playwright 运行在 Python 中,所以可以使用 debugger 调试它。Playwright 自带 Playwright Inspector,它允许你逐步通过 Playwright API 调用,查看它们的调试日志,以及探索选择器(selectors)。
![]()
查看我们的调试指南(debugging guide)来了解关于 Playwright Inspector 以及使用浏览器开发者工具(Browser Developer tools)进行调试的更多信息。
5. 测试生成器
Playwright 具有开箱即用的生成测试的能力,这是快速开始测试的好方法。它会打开两个窗口,一个是浏览器窗口,通过它你可以与希望测试的网站进行交互,另一个是 Playwright Inspector 窗口,通过它你可以录制测试、拷贝测试、清除测试以及改变测试的语言。
你将学习:
– How to generate tests with Codegen
5.1. 运行代码生成器(Codegen)
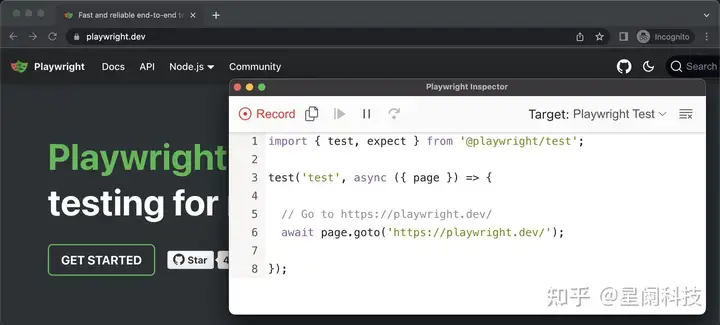
playwright codegen Fast and reliable end-to-end testing for modern web apps | Playwright
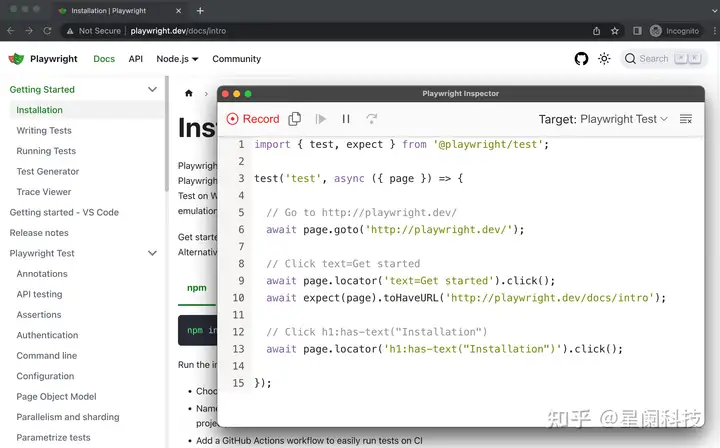
运行 codegen,然后在浏览器中执行操作。Playwright 会为用户的交互生成代码。Codegen 会尝试生成弹性的基于文本的选择器。
![]()
当你完成与页面的交互时,按下record按钮停止录制,使用copy按钮把生成的代码拷贝到编辑器。
![]()
使用 clear 按钮清除代码,重新开始录制。完成时,关闭 Playwright Inspector 窗口,或停止终端命令。
要了解有关生成测试的更多信息,请查看 Codegen 的详细指南。
6. 追踪查看器(Trace Viewer)
Playwright 追踪查看器是一个 GUI 工具,它使你可以探查你的测试中记录的 Playwright 追踪,你可以在测试的每个操作中来回移动,可视化地查看每个操作期间正在发生什么。
你将学习:
– 如何记录追踪
– 如何打开 HTML 报告
– 如何打开追踪查看器
6.1. 记录追踪
像下面一样使用 browser_context.tracing API 记录追踪:
browser = chromium.launch()
context = browser.new_context()
# Start tracing before creating / navigating a page.
context.tracing.start(screenshots=True, snapshots=True, sources=True)
page.goto(“Fast and reliable end-to-end testing for modern web apps | Playwright”)
# Stop tracing and export it into a zip archive.
context.tracing.stop(path = “trace.zip”)
这将记录追踪,并把它放到名称为trace.zip的文件中。
6.2. 打开追踪
你可以使用 Playwright CLI 打开保存的追踪。
playwright show-trace trace.zip
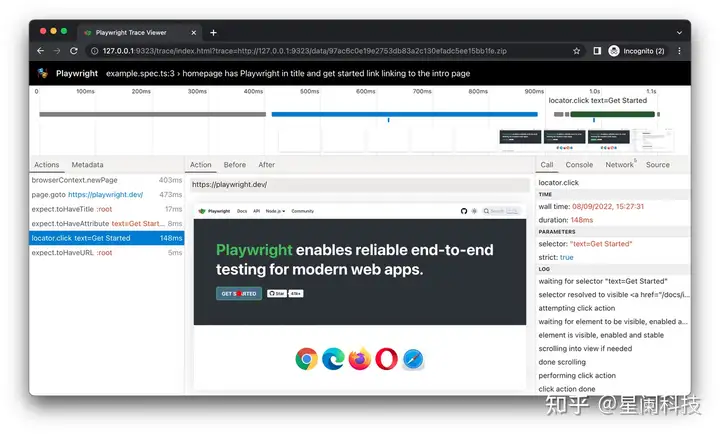
6.3. 查看追踪
通过单击每个操作或使用时间轴悬停来查看测试的追踪,以及查看操作前后的页面状态。在测试的每个步骤期间查看日志、源和网络。追踪查看器创建 DOM 快照,因此你可以与它进行交互,打开开发者工具(devtools)等。
![]()
要了解更多信息,请查看 Trace Viewer 的详细指南。
7. Pytest 插件参考
Playwright 提供 Pytest 插件来编写端到端的测试。如果想要使用它,请参考 getting started guide。
7.1. 用法
使用 Pytest CLI 运行测试:
pytest –browser webkit –headed
如果你想自动地添加 CLI 参数,请使用 pytest.ini 文件。
7.2. CLI 参数
- – –headed:以有头模式运行测试(默认:无头)
- – –browser:用不同的浏览器 chromium、firefox、webkit 运行测试。可以指定多次(默认:所有浏览器)
- – –browser-channel:使用的 Browser channel
- – –slow-mo:使用慢动作运行测试
- – –device:模拟的设备(Device)
- – –output:用于测试生成的制品(aritifact)的目录(默认:test-results)
- – –tracing:是否为每次测试记录追踪(trace)。on、off 或 retain-on-failure(默认:off)
- – –video:是否为每次测试录制视频。on、off 或 retain-on-failure(默认:off)
- – –screenshot:是否在每次测试后,自动地捕获截屏。on, off, or only-on-failure (默认:off)
7.3. Fixture
该插件给 pytest 配置 Playwright 特定的 fixture(fixtures for pytest)。为使用这些 fixture,使用 fixture 名称作为测试函数的参数。
def test_my_app_is_working(fixture_name):
# Test using fixture_name
# …
函数作用域:这些 fixture 在测试函数请求时创建,在测试结束时销毁。
- – context:用于测试的新浏览器上下文(browser context)
- – page:用于测试的新浏览器页面(browser page)
会话作用域:这些 fixture 在测试函数请求时创建,在测试结束时销毁。
- – playwright:Playwright 实例
- – browser_type:当前浏览器的 BrowserType 实例
- – browser:Playwright 启动的 Browser 实例
- – browser_name:浏览器名称
- – browser_channel:浏览器通道(channel)
- – is_chromium、is_webkit、is_firefox:各自浏览器类型的布尔值
自定义 fixture 选项:对于 browser 和 context fixture,使用下面的 fixture 定义自定义启动选项。
- – browser_type_launch_args:重写用于 browser_type.launch(**kwargs) 的启动参数。它应该返回字典
- – browser_context_args:重写用于 browser.new_context(**kwargs) 的选项。它应该返回字典
7.4. 并行:同时运行多个测试
如果测试运行在有许多 CPU 的机器上,可以通过使用 pytest-xdist 同时运行多个测试,加快测试套件的整体执行时间。
# install dependency
pip install pytest-xdist
# use the –numprocesses flag
pytest –numprocesses auto
根据硬件和测试的特性,可以将 numprocesses 设置为 2 到机器上 CPU 数量之间的任意值。如果设置得过高,可能产生非预期行为。
有关 pytest 选项的常用信息,请参考 Running Tests。
7.5. 示例
配置 Mypy 类型以自动补全
# test_my_application.py
from playwright.sync_api import Page
def test_visit_admin_dashboard(page: Page):
page.goto(“/admin”)
# …
配置慢动作
使用 –slowmo 参数以慢动作运行测试。
通过浏览器跳过测试
# test_my_application.py
import pytest
@pytest.mark.skip_browser(“firefox”)
def test_visit_example(page):
page.goto(“Example Domain”)
# …
在特定的浏览器上运行测试
# conftest.py
import pytest
@pytest.mark.only_browser(“chromium”)
def test_visit_example(page):
page.goto(“Example Domain”)
# …
使用自定义的浏览器通道运行
pytest –browser-channel chrome
# test_my_application.py
def test_example(page):
page.goto(“Example Domain”)
配置 base-url
使用 base-url 参数启动 Pytest。pytest-base-url 插件允许你通过配置、CLI 参数或像 fixture 一样设置 base url。
pytest –base-url http://localhost:8080
# test_my_application.py
def test_visit_example(page):
page.goto(“/admin”)
# -> Will result in http://localhost:8080/admin
忽略 HTTPS 错误
# conftest.py
import pytest
@pytest.fixture(scope=”session”)
def browser_context_args(browser_context_args):
return {
**browser_context_args,
“ignore_https_errors”: True
}
使用自定义窗口大小
# conftest.py
import pytest
@pytest.fixture(scope=”session”)
def browser_context_args(browser_context_args):
return {
**browser_context_args,
“viewport”: {
“width”: 1920,
“height”: 1080,
}
}
设备仿真
# conftest.py
import pytest
@pytest.fixture(scope=”session”)
def browser_context_args(browser_context_args, playwright):
iphone_11 = playwright.devices[‘iPhone 11 Pro’]
return {
**browser_context_args,
**iphone_11,
}
或通过命令行
持久化上下文
# conftest.py
import pytest
from playwright.sync_api import BrowserType
from typing import Dict
@pytest.fixture(scope=”session”)
def context(
browser_type: BrowserType,
browser_type_launch_args: Dict,
browser_context_args: Dict
):
context = browser_type.launch_persistent_context(“./foobar”, **{
**browser_type_launch_args,
**browser_context_args,
“locale”: “de-DE”,
})
yield context
context.close()
从持久化上下文创建测试内部的所有页面。
与 unittest.TestCase 一起使用
参考下面的示例,了解如何与 unittest.TestCase 一起使用。这有一个限制,即只能指定一个浏览器,并且在指定多个浏览器时不会生成多个浏览器的矩阵。
import pytest
import unittest
from playwright.sync_api import Page
class MyTest(unittest.TestCase):
@pytest.fixture(autouse=True)
def setup(self, page: Page):
self.page = page
def test_foobar(self):
self.page.goto(“https://microsoft.com”)
self.page.locator(“#foobar”).click()
assert self.page.evaluate(“1 + 1”) == 2
7.6. 调试
在代码中使用 breakpoint() 语句停止执行,获取 pdb REPL。
def test_bing_is_working(page):
page.goto(“https://bing.com”)
breakpoint()
# …
7.7. 部署到 CI
请查看 guides for CI providers 获取关于将测试部署到 CI/CD 的信息。
8. 认证
Playwright 可用于需要认证的自动化场景。
用 Playwright 编写的测试在被称为浏览器上下文(browser contexts)的独立的干净的环境中执行。这种隔离模型可以提升复现性,防止级联测试失败。新浏览器上下文可以加载现有的认证状态。这可以消除在每个上下文中登录的需求,加快测试执行的速度。
注意:本指南覆盖 cookie/token-based 认证(通过 app UI 登陆)。对于 HTTP 认证(HTTP authentication),请使用 browser.new_context(**kwargs)。
8.1. 自动化登录
Playwright API 可以与登陆表单自动化交互(automate interaction)。
下面的例子自动化登陆到 Github。执行这些步骤之后,浏览器上下文将被认证。
page = context.new_page()
page.goto(‘https://github.com/login’)
# Interact with login form
page.get_by_text(“Login”).click()
page.get_by_label(“User Name”).fill(USERNAME)
page.get_by_label(“Password”).fill(PASSWORD)
page.get_by_text(‘Submit’).click()
# Continue with the test
为每次测试重做登录会减慢测试的执行速度。为缓解这种情况,应该重用现有的认证状态。
8.2. 重用签入状态
Playwright 提供在测试中重用签入(signed-in)状态的方式。通过该方式,可以只登陆一次,然后跳过所有测试的登陆步骤。
Web 应用使用基于 Cookie 或基于 Token 的认证,认证状态被当作 cookies 存储,或存储在 local storage 中。Playwright 提供 browserContext.storageState(options) 方法,可使用它从已认证上下文中获取存储状态,然后使用预填充状态创建新上下文。
Cookie 和 Local Storage 状态可以跨不同的浏览器使用。它们依赖应用程序的认证模型:有些应用程序可能同时需要 Cookie 和 Local Storage。
下面的代码片段从已认证上下文中获取状态,然后使用该状态创建新上下文。
# Save storage state into the file.
storage = context.storage_state(path=”state.json”)
# Create a new context with the saved storage state.
context = browser.new_context(storage_state=”state.json”)
8.3. Session Storage
session storage 很少用于存储与登陆状态相关的信息。Session Storage 特定于特定的域,页面加载时它不会持久化。Playwright 没提供用于持久化 Session Storage 的 API,但下面的片段可用于保存/加载 Session Storage。
import os
# Get session storage and store as env variable
session_storage = page.evaluate(“() => JSON.stringify(sessionStorage)”)
os.environ[“SESSION_STORAGE”] = session_storage
# Set session storage in a new context
session_storage = os.environ[“SESSION_STORAGE”]
context.add_init_script(“””(storage => {
if (window.location.hostname === ‘Example Domain’) {
const entries = JSON.parse(storage)
for (const [key, value] of Object.entries(entries)) {
window.sessionStorage.setItem(key, key)
}
}
})(‘””” + session_storage + “‘)”)
8.4. 多因子认证
使用多因子认证(MFA)的账户无法完全自动化,需要人工干预。持久化认证可用于部分自动化 MFA 场景。
8.4.1 持久化认证
注意持久化认证不适用于 CI 环境,因为它依赖磁盘位置。用户数据目录特定于浏览器类型,不能跨浏览器类型共享。
用户数据目录可以与 browser_type.launch_persistent_context(user_data_dir, **kwargs) API 一起使用。
from playwright.sync_api import sync_playwright
with sync_playwright() as p:
user_data_dir = ‘/path/to/directory’
browser = p.chromium.launch_persistent_context(user_data_dir, headless=False)
# Execute login steps manually in the browser window
生命周期
1. 在磁盘上创建用户数据目录
2. 使用用户数据目录启动持久化上下文,然后登陆 MFA 账户
3. 重用用户数据目录来运行自动化场景
9. 事件
Playwright 允许监听发生在 Web 页面上的多种类型的事件,比如网络请求、子页面的创建、专用 Worker 等。可以通过多种方式订阅这些事件,比如等待事件或添加/移除事件监听者。
9.1. 等待事件
大多数时间,脚本需要等待特定的事件发生。下面是一些典型的事件等待模式。
使用 page.expect_request(url_or_predicate, **kwargs) 等待拥有指定 URL 的请求:
with page.expect_request(“**/*logo*.png”) as first:
page.goto(“https://wikipedia.org”)
print(first.value.url)
等待弹出窗口:
with page.expect_popup() as popup:
page.evaluate(“window.open()”)
popup.value.goto(“https://wikipedia.org”)
9.2. 添加/移除事件监听者
有时,事件发生在随机的事件,而不是等待它们,需要处理它们。Playwright 支持订阅/取消订阅事件的传统语言机制:
def print_request_sent(request):
print(“Request sent: ” + request.url)
def print_request_finished(request):
print(“Request finished: ” + request.url)
page.on(“request”, print_request_sent)
page.on(“requestfinished”, print_request_finished)
page.goto(“https://wikipedia.org”)
page.remove_listener(“requestfinished”, print_request_finished)
page.goto(“https://www.openstreetmap.org/”)
9.3. 添加一次性监听者
如果特定事件需要被处理一次,那么可以使用便捷的 API:
page.once(“dialog”, lambda dialog: dialog.accept(“2021”))


评论